I spent the afternoon working on the door to the dollhouse. It’s pretty much done, though I have to do a bit of finishing work because it doesn’t fit perfectly. The door (which is actually 2 doors glued together) are from the replacement kit that Barbara sent me. The original house had no door. Greenleaf dollhouses are dicey on fit to begin with, but since the replacement doors were from a newer kit, the fit isn’t exact. I’ll try to tweak them, but frankly, I’m just thrilled that I got them in there! And that my leaded glass insert worked.
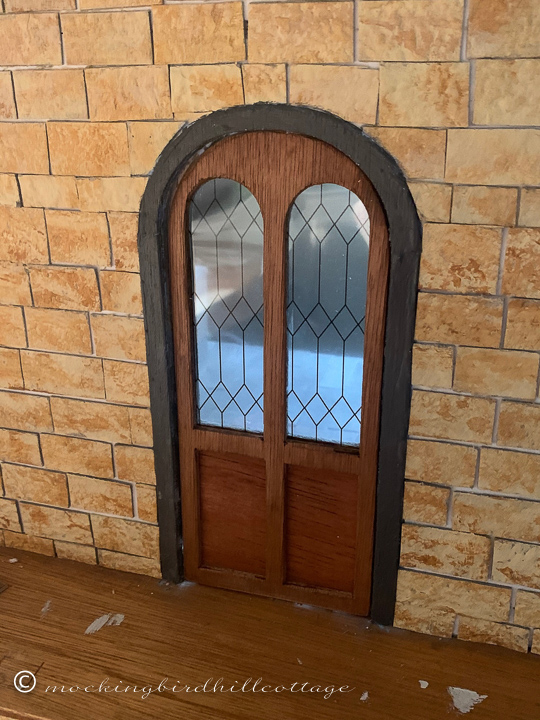
No doorknob yet. I’m looking into that. I wanted the outside of the door to be stained and I applied 4 coats to get it to the color I wanted. I could have painted it dark gray like the trim, but that was too matchy-matchy and I thought it deserved a rich wood finish.
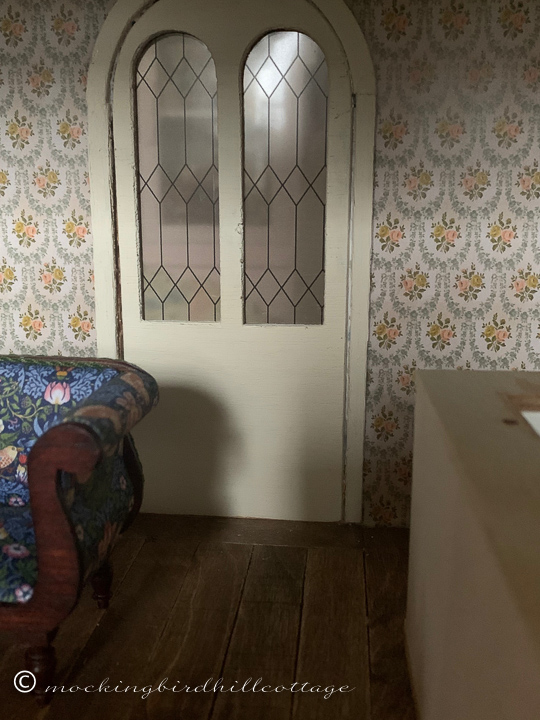
Since Greenfield doesn’t supply any hinges and miniature door hinges are notoriously hard to install with all sorts of stories about damaging the wood, I went with a suggestion that I found on the Greenfield forum. Insert a piece of chamois or fabric or Tyvek between the two halves of the door and then insert it between the molding/trim and the wall. I used Tyvek from an old envelope. It worked. Not beautifully, but it worked. I very seldom open the door on Hummingbird Cottage since I’m usually looking at it from the big opening, so I’m fine with it the way it is. I’ll add some touch-up paint where the trim doesn’t quite meet the door.
This is why I don’t like this brand of dollhouse. They are less expensive, which is great, as dollhouses can be expensive, but the savings is shown in cheap plywood that is splintery and components that aren’t uniform. Every piece of trim that is to be used around the windows and doors is uneven, narrower at the top or the bottom. It’s annoying. Everything has to be sanded and when you sand, you risk making the piece too small, as large chunks of wood come off. So you have to try to fix things, which results in a lot of extra work. If they provided the windows and doors as inserts already installed in frames, I’d like these kits a whole lot more.
Complaints aside, I think a little more tweaking will make them look even better. Baseboards are next, but I usually hold off on them until I’m sure of furniture placement. I don’t install one long baseboard on walls where there will be furniture, as the furniture is then too far away from the wall. (It’s why I don’t like the baseboard heating in my real life house.) Once I know where everything should be, I cut the baseboards to fit around the furniture. So, that can wait.
Now, the bedroom. And, of course, gathering more and more bits and bobs for the living room and kitchen. I love decorating the rooms, it’s my favorite part of the process.
Hang in there. Last night, I had my first really good night’s sleep in a long time. Sigh of relief.
Stay safe.
Happy Thursday.


The door looks great, especially love the leaded glass.
I am sleeping better, but I can’t pull myself away from the news as much as I probably should. Still so much to be concerned about.
And I just saw a message on facebook from a local Dr about how serious the situation is at our hospital. The staff is overwhelmed and it’s going to get worse before it gets better.
At least the sun is shining today.
Enjoy your day…stay safe
Yes, I read yesterday that 48 states are now hotspots for COVID.
This is not good.
Stay safe, Marilyn!
Great job on the door! That fiddly work is stressful, but so satisfying when you get it (almost) the way you envisioned. Even tho it’s not your favorite, I’m so glad you are rescuing this house. It’s going to be beautiful! Gray day here, good for reading. Stay safe!
I love the little house, just not the way it’s manufactured. The challenges are there, but I learn something with each one.
Stay safe, Nora.
You did a wonderful job with the door! I especially like the ‘glass’ insert. Now that the mail-in ballots are done, is your postal service in America back on track?
Too early to tell. I haven’t really had a any problems – maybe a few from Amazon. I’m hoping that all is back to normal soon. It certainly will be in January!
Stay safe, Barbara.
Meant to ask what colours the bedroom will be! Any thoughts on that yet?
I added a photo of the wallpaper in today’s post, Barbara.
It’s remarkable what a good nights sleep will do for one’s outlook on things, isn’t it? I just feel more ready to tackle what’s thrown at me in the course of a day.
The door looks great. Again…I salute your patience. Stay safe! ;)
Yes, indeed!
Thanks so much, Donna.
Stay safe!
I totally agree with the quality and proper fit of the components. Its even more painful to improve a completed kit from greenleaf. It looks good as a whole. But if you look closer, there where uneven edges and gaps everywhere. I had to remove all windows and doors to sand them and paint again from my beacon hill. I had to thicken the walls to fit to the components of the manufacturers doorways. There where no doors to the rooms except that entrance door. I even didn’t like the original colour so I changed it. I turned the installed stairway from brown to shabby white. I didn’t know I have so much patience. That’s why all takes so long. I have a plan in my head and I will not rest until it’s finished, I have an aim and I will go for it, slowly but steady. The journey is the destination. Your Arthur dollhouse is getting more and more perfect, Claudia. Great pleasure to see it grow. Stay safe Helga
Same here. My house was already completed! I completely redid my first dollhouse, as well – also already constructed. But it had better materials. It does take patience! I’m like you, I want it to look better than it does. If I had it to do over again, I would have removed the outside window trim before painting it. I should have figured out that the window would be difficult. But that’s what happens, we learn as we go!
Thanks so much, Helga.
Stay safe!
I know you can see imperfections, but to me, the door looks beautiful!! The look is fantastic in the room!
Covid is so bad here, they have had to come up with new categories. And I just saw on the local news that thousands of new “seats” have been added to what the airlines are selling for Thanksgiving. Let’s just haul the germs all over the country and take out a few thousand more. I truly do not understand. Why can’t people simply stay home? Selfish, selfish, selfish!!
I’m so sorry about the COVID surge in WI. I think it’s coming here as well.
Selfish is exactly it. I’m so tired of selfish people who care about nothing by themselves.
Stay safe, Chris.
I have two sets of cousins who are gathering for T/giving. Another friend who’s doing the same with her family. Not shared households. They just won’t change. They won’t be denied. And I’m scared they’re going to make themselves sick. It’s a very heated, sensitive subject. Why? Why can’t people be on the same wavelength; the same game-plan? One doctor was basically saying on TV in an interview, what’s wrong with people; could you just try to get thru the next four months without dying? Do you want to unintentionally kill somebody else; can you live with that? I was over reading at Susan Branch and she said, “Haven’t we just HAD it with this thing? Yes, we have. I will be knitting on Thanksgiving, watching old movies, calling people, and counting my blessings.” (Meaning, not gathering with friends or family; they’re having a really bad time with Covid on Martha’s Vineyard now. Their main grocery store is even shut down. She’s staying in.)
Very proud of another friend of mine who’s alone and would love to drive an hour to get to her niece and family for Thanksgiving but she’s decided to be wise and stay home. It just takes some mental planning; to get your head in the right place about it and know that it won’t always be like this.
I’m feeling pretty uneasy again about Covid, to the point of canceling two medical appointments and opting for tele-med whether my one doctor likes it or not. Also, we’re doing some fairly intensive stocking up tomorrow at the grocery store and then my husband is really wanting to do our own version of lockdown for some number of weeks, even more than we did in March. Be on the safe side. He was gonna get a haircut one more time and decided not to; I said I don’t care if it gets long again. Just trying to reduce the errands; reduce that ‘viral footprint’ wherever we can. It’s looking like these winter holidays are going to be a very rough ride in the U.S. As in the ENTIRE U.S. I heard one of the ‘experts’ saying, “You’re not even going to want to go out to the grocery store.” Gulp.
Talked to relatives in Wyoming last night. My brother-in-law’s cardiologist isn’t even going home. He’s brought in a trailer to stay in, in the hospital parking lot. It’s all hands to help, no matter your medical specialty. Very dire.
Stay home as much as possible; stay safe. Hunker down. Same old drill, but more important than ever.
We’re thinking about all of that, as well. Watching the numbers, listening to the experts and to Governor Cuomo.
It’s endless, made more so by the selfish fools who won’t even think of others.
xo
So glad you had a good night’s sleep — always helps before doing fussy work like this. And it looks terrific. I’m so glad you know your way around these types of houses and others so you can come up with reliable fixes and know how to implement them. That front — the stone work is quite spectacular. I know from your posts how long it took and it was time well spent. It looks fabulous. And as Chris K. said, I know you can see the imperfections. I just see lovely. (We are always our toughest critic!)
I have two more appointments and then I’m locked in by and large. Fingers crossed all goes well with both.
This particular type of house I don’t know my way around! Hence, the learning as I go.
I am definitely always my toughest critic, Jeanie!
Good luck with your appointments and stay safe.
Ah, healing sleep; blissful.
The door is fantastic! And, by the way, I actually LIKE the wallpaper.
I’m glad you do!
Thanks, Vicki.
Stay safe.
glad you slept better. it can make such a difference in the day!
and you are making such a difference in the dollhouse … it looks great! your patience and love of decorating show and i hope you feel proud of your efforts!
i agree with you about baseboard heating! i have that kind of heating now and find the temperature in the room is steadier than the charming radiators i much prefer (important because local law only requires a landlord to turn on the heat from december 01 to march 31 and
it has to test at 68 degrees four feet away from the heating system … 68!). anyway, back to baseboard heating … yes, it does limit furniture placement and makes the rooms look and feel smaller. oh, well … i am grateful that my landlord keeps the heat more like 72 or 73 … much better!
hope you are having a nice night. stay safe!
kathy in iowa
Thank you, Kathy.
Stay safe.
Wow! You’ve done and amazing job on your house! My grandma always said, “Don’t point out the imperfections you see in your projects. No one else will ever notice them.” She was very wise!
Can’t help it! That’s the way I am.
Stay safe, Betsy!