Mockingbird Hill Cottage

Mockingbird Hill Cottage

  • About MHC
    • Disclosure
  • Dollhouses/Minis
    • Hummingbird Cottage
    • The Studio (Formerly TSP)
    • Dove Cottage
    • The Lake House
    • The Folk Art Dollhouse
    • The Modern Dollhouse
    • Dollhouse Source List, Information and Tutorials
  • On the Road
  • Collecting
    • Roseville Pottery
    • McCoy Pottery
    • Egg Cups
    • Bakelite
  • Press
  • Privacy Policy
You are here: Home / Archives for decorating

Imitation is the Sincerest Form of Flattery…

March 13, 2012 at 8:30 am by Claudia

I’ve never thought of myself as someone who is a decorating trend setter. Until now.

“Really, Claudia?” you say.

Yes, really. Let me state my case in a simple, forthright manner.

A few months ago, I purchased this chair for the dollhouse. If you doubt my words, read this post.

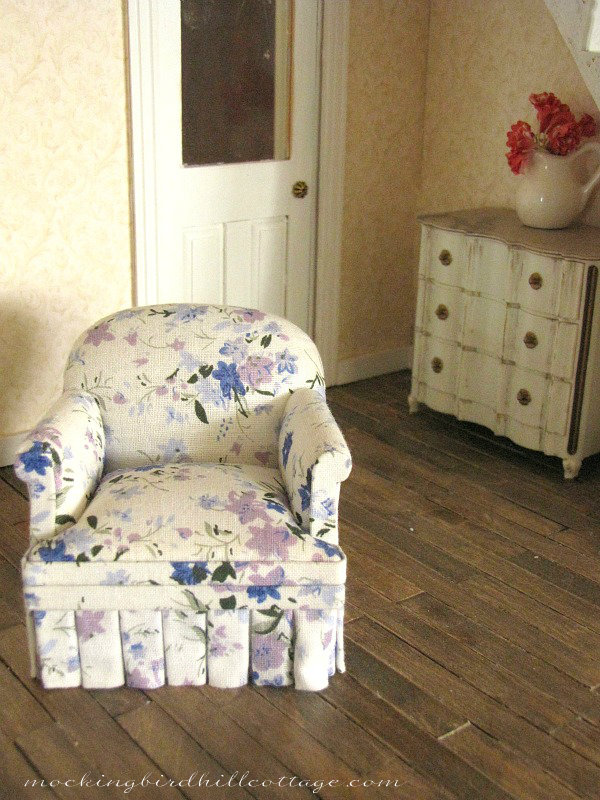
A comfy, ‘Christmas in Connecticut’, all-around beautiful chair. Predominantly in blue and white.

Yesterday, I opened the current issue of Country Living to find this:

Now, I hesitate to say that Country Living is following my blog and emulating my every decorating move, but…..you’ve seen the photos. The evidence is right in front of your eyes. They didn’t credit me, but I’m a magnanimous person. I’ll take the high road. If I’ve inspired them in any way, I’m happy. They took the safe route, of course, with blue and white, while I was a tad more daring with the addition of a dash of lavender.

They’re still learning.

Filed Under: Country Living, decorating, dollhouse 37 Comments

Defending the Small House – Decorating Walls

February 7, 2012 at 9:00 am by Claudia

Hey, it’s Small House time again! Welcome back.

This month, Brenda and I are going to talk about Decorating Walls in a Small Space. Now, you might think that I’m going to say something like, Be Careful – don’t put too much on your walls if you live in a small space! On the contrary. I think you should approach the walls in a small space the same way you would in a larger space. Fill them with what you love, what moves you, what has meaning.

So let’s talk about my house and the ways in which I display things on my walls, and hopefully, I can give you some tips along the way. I’ve always adorned my walls (oh that poster of Robert Redford as the Sundance Kid in my dorm room!) and am a firm believer in it. Don and I have lots of framed pieces we love, some are on display, others are stored away. But everything we have has meaning. I know, I say that all the time, but it’s true.

Tip #1 – Tell a story with your decorated wall space.

These two oil paintings live on the wall by our front door. The top one is of our cottage and was painted by my dad. The one on the bottom is of my grandmother’s childhood home in Canada and was painted by my great-aunt. Putting these two paintings together tells a story about my life now and the life of my ancestors.

Tip#2 – Use words, letters and graphics. They give personality to a room. It’s good to have a mix of paintings, prints and graphics.

I hung this sign on the wall above the landing on our staircase. The bold graphic is great and it’s playful, as well.

This sign, painted by Paula of Castle and Cottage Signs, hangs above the window that is over our kitchen sink.

More graphics in the living room. The Keyboard School sign over the piano and the vintage Hymns sign from an old church. These also fulfill the advice in Tip #1. They tell a story – about music – and they are purposefully placed by the piano.

This sign hangs over the archway into our living room and takes advantage of the high ceilings in the kitchen. We looked long and hard for a sign that was rectangular in size and would work in that space. Which leads me to Tip# 3: Think up. Don’t forget the the area of the wall that is near the ceiling. Hanging something up that high can make your room seem larger. You can see that I hung a vintage Currier & Ives print up high in the den (just look through those french doors.)

I hung the Cottage Home sign high up over the kitchen windows. You can see it as you enter the house as well as from the den and it says everything about how I feel about our house. (Sign by my friend Rita of Mammabellarte.)

Tip #4  – Don’t just use large expanses, use smaller expanses and corners. I love using little nooks and corners to hang favorite pieces.

This little section of wall borders the spinet desk by the stairs. I hung this little print there. It fits perfectly. On the right is the door to the bathroom.

This little section of wall is by the desk in the den. Immediately to the right is a closet door. On top is a favorite print of mine and below is a little shelf holding some of my favorite miniatures. If just the desk was there, it would be nice, but adding these two pieces on the wall makes the corner.

Tip#5 – Sometimes less is more. Two areas of my house come to mind.

This area, by the loveseat in the living room, has only one small framed piece on either side of the window. This lampshade is such a favorite of mine with its pretty flowered print and fringe, that I used the simple painting by Christie Repasy to echo that same flowery feeling. The color of the chippy wood frame is in the same family as the background color on the lamp. Simple and effective.

The other example is in this photo. The cabinet is substantial, has green pottery displayed on top and a crochet banner across the door. The two little rose prints on the left pick up those colors and help complete the total picture. Just two little prints.

Tip #6 – Use shelves and architectural salvage on your walls to decorate. I’ve done this throughout the house. I have little shelves holding my egg cup collection, little shelves in my studio, and some big shelves, too.

Here is a wall in my studio. I used an old mantel to create a shelf and to make a statement. And you can see, I’ve added all sorts of treasures to the rest of the wall space; a pretty memory board, a couple of prints that I love, a tiny little shelf. All of it together says a great deal about me and my studio space. Rather than work around it, I also used the funky slant to the ceiling to my advantage. I think it makes the whole thing more striking.

Another shelf, nestled under the slanted ceiling and hung on the wall, makes this niche pop.

Tip #7 – When you’re hanging something above a sofa or a chair, don’t hang it too high.  Sometimes I visit someone who has a painting above the sofa and it’s just too high. There’s too much space between the furniture and the painting. It should be hung at eye level. Excuse the messy pillows, but I snapped this to show you that this rather large print is hung fairly close to the sofa. It’s actually closer than this picture makes it seem. You don’t want too much dead space between the sofa and the painting.

Also, keep what you hang proportional to that large piece of furniture.

Tip #8 – Have fun! Hang some jumping jacks…or hang something else whimsical and fun. Not everything has to be just so or perfect. Wouldn’t you rather have have something on display that makes you smile?

If you walked around my little cottage, you’d see something hung on nearly every wall – maybe every wall. I think the things you hang on your walls tell a story about you.  Don’t be afraid to combine prints with graphics with architectural salvage. Create wall vignettes. Have fun and don’t be shy because you have a small space. Go for it!

Be sure to stop by and see Brenda’s tips for Decorating Walls. Have a great day!

Filed Under: decorating, defending the small house 29 Comments

The Reveal: Doily/Industrial Swag Light

February 3, 2012 at 9:00 am by Claudia

Yesterday: I’m home sick with a bad cold, Don leaves for an audition in the city, I stare at the doily covered lampshade sitting on kitchen table. I blow my nose. And stare some more. About 30 seconds later, I am out of the blogging chair and on my way outside for the ladder. Then I’m measuring cautiously and wondering just where to drill. Then, true to form, I just go for it. I install the toggle bolt in the ceiling (pretty easy, after all) and after much adjustment, the lamp is up!

It was an impossibly gloomy day, but I was excited to show you some photos so I went ahead and took some anyway.

I originally had the cord swagged to the right of the window. However, that stretched the 15 foot red cord so much that I was going to have to use an extension cord. And if I used an extension cord, the original red cord wouldn’t be as taut as it needs to be. So after much drilling and redrilling (now I have to spackle those holes) I ended up swagging the cord to the left. I rather like it swagged at an angle.

The lamp is hanging a bit lower now than it was when I took this picture. I’m still tweaking.

It’s so much easier for me to embark on these DIY adventures when Don isn’t around. I wonder why that is? I guess I don’t have to answer questions or explain myself and I can make a mess without worrying that I’m disturbing him. And then when he comes home, it’s done, without discussion. I know you understand.

From the other side of the table. By the way, I attached the doilies with some hand quilting thread, which is nice and strong. I tacked them to various parts of the frame and to each other.

Another view. I promise to take more photos when it’s sunny.

I briefly considered going with a drum shade. I like the look of them. But, they’re everywhere nowadays and, for better or worse, if everyone is doing something I tend to go in the opposite direction.

I really love this funky little light. And when I look at it from the den, I see that it hangs smack dab in the middle of the archway that leads into the kitchen. Perfect.

Cost:
Lamp frame: I had it on hand. I ripped off the old fabric, which was stained and ugly.
Doilies – I think one was $3 and the other was $2. The third doily was in my stash.
The cloth covered cord and socket kit from Shandell’s was my biggest expense, but it was worth it. Where else could you get a red cord, I ask you? I chose the 15′ cord which was a bit higher in price. The cost of the kit was $49.00.

By the way, I’ve looked at various other hanging cords and they are all plastic and look like they should be hidden behind a table or covered with those cloth sleeves that people use to disguise hanging cords. Susan’s cords are cloth-covered and handsome. They enhance the lamp.

So, basically, I got a hanging light for my kitchen without the cost of an electrician. The whole thing was a little over $50.00.

A little later in the day. Note spackle on table.
If you’d like, I can put together a tutorial in a few days. Let me know.
Even though I was home sick, I sure had a lot of fun! Don came home around 7 p.m. I arranged it so that just the hanging light was on – he loves it.


Filed Under: decorating, DIY 49 Comments

  • « Previous Page
  • 1
  • …
  • 60
  • 61
  • 62
  • 63
  • 64
  • …
  • 90
  • Next Page »
  • Email
  • Instagram

Welcome!

Welcome!

I live in a little cottage in the country with my husband. It's a sweet place, sheltered by old trees and surrounded by gardens. The inside is full of the things we love. I love to write, I love my camera, I love creating, I love gardening. My decorating style is eclectic; full of vintage and a bit of whimsy.

I've worked in the theater for more years than I can count. I'm currently a voice, speech, dialect and text coach freelancing on Broadway, off Broadway, and in regional theater.

Thanks for stopping by.

Searching?

The Dogs

The Dogs

Scout & Riley. Riley left us in 2012. Scout left us in February 2016. Dearest babies. Dearest friends.

Winston - Our first dog. We miss you, sweetheart.

Lambs Like to Party

Lambs Like to Party

A Note

Thanks for visiting! Feel free to browse, read and enjoy. All content is my own; including photos and text. Please do not use anything on this site without permission.

Disclosure/Privacy Policy can be found in the Navigation Bar under ‘About MHC.’

Also, I love receiving comments! I do, however, reserve the right to delete any comment that is in poor taste, offensive or is verging on spam. It’s my blog. If you’re a bot or a troll you’ll be blocked. Thanks!

Archives

All Content © 2008 - 2025 Mockingbird Hill Cottage · Log in