Mockingbird Hill Cottage

Mockingbird Hill Cottage

  • About MHC
    • Disclosure
  • Dollhouses/Minis
    • Hummingbird Cottage
    • The Studio (Formerly TSP)
    • Dove Cottage
    • The Lake House
    • The Folk Art Dollhouse
    • The Modern Dollhouse
    • Dollhouse Source List, Information and Tutorials
  • On the Road
  • Collecting
    • Roseville Pottery
    • McCoy Pottery
    • Egg Cups
    • Bakelite
  • Press
  • Privacy Policy
You are here: Home / Archives for miniatures

How to Make a Hardwood Floor for Your Dollhouse

November 29, 2013 at 9:53 am by Claudia

I shudder at my temerity in presenting any sort of miniature tutorial. But then I remember that a lot of you are just like me. We’re women who love the idea of having our very own dollhouse to decorate. We’re not miniaturists. We just want to putter and play. So, without further ado, here is a little tutorial on putting in a hardwood floor in your dollhouse. Every room in the dollhouse, save for the bathroom, has one. I’ve used a wood stain in some of the rooms and a painted floor in others.

When I was ready to install my first floor, I went to a restaurant supply store and bought a big box of coffee stirrers. However, when I got them home, I quickly realized that they were too narrow for the dollhouse.  (Anyone need some coffee stirrers?)

fristicks1

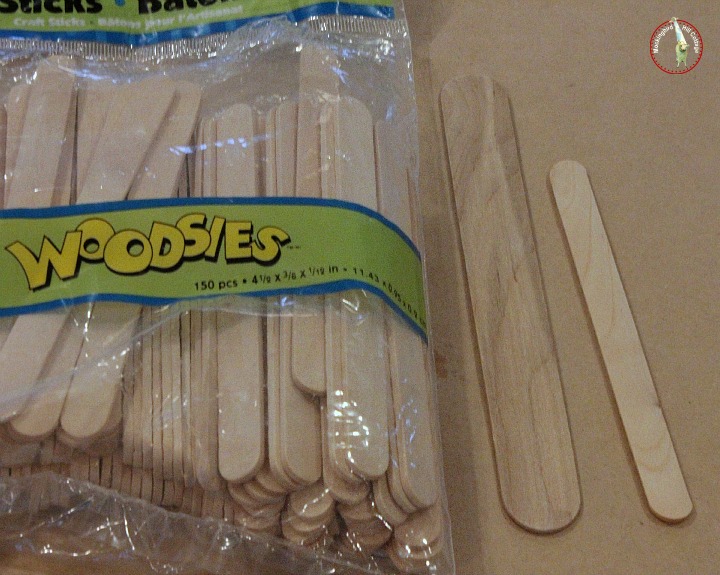
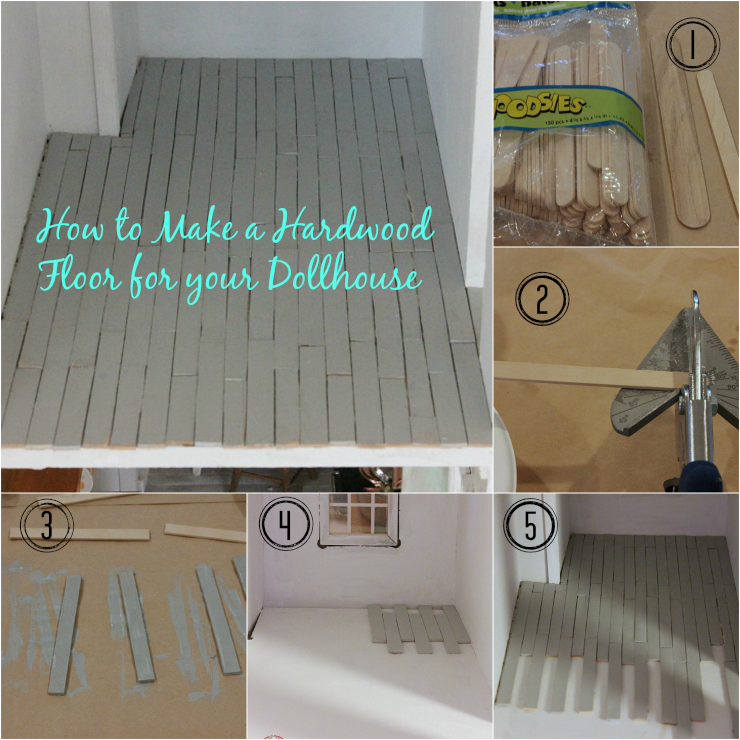
So I went to Michael’s and bought some wooden sticks. The stick on the right is the size of a popsicle stick. The one on the left is tongue-depressor sized. I used that one in the bedroom.

friezcutter

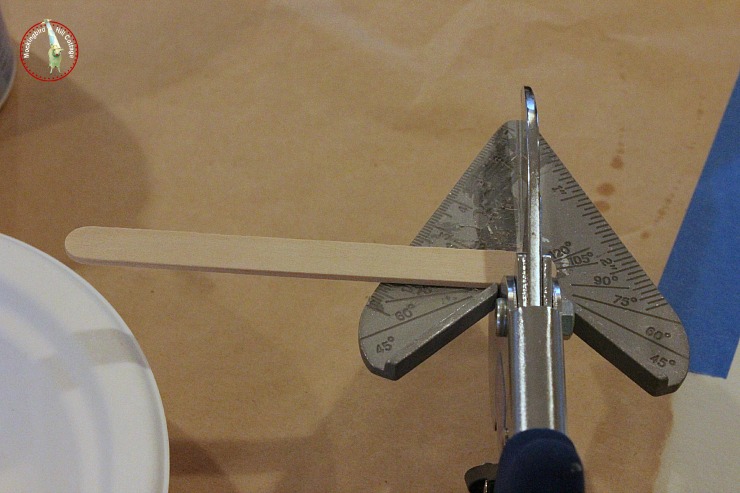
Using my favorite tool, the Easy Cutter, I cut off the rounded ends of the sticks. (The Easy Cutter is a must have if you’re going to be cutting wood to make moldings or baseboards or flooring. Or just about anything. You can find one at Miniatures.com.)

fripaintedsticks

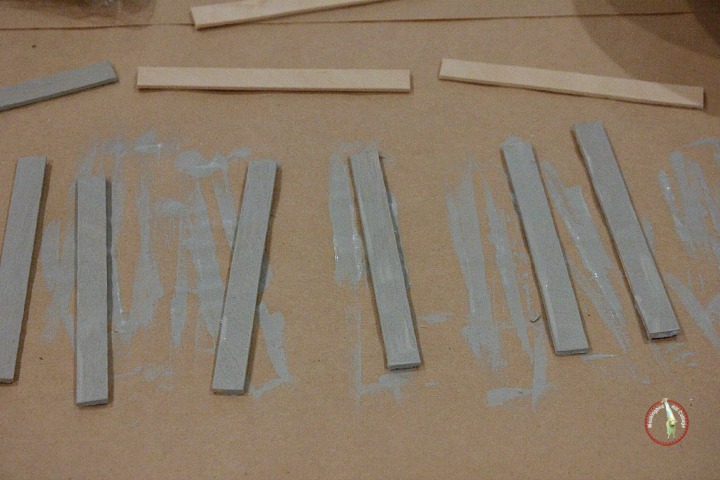
Then I paint or stain the sticks. It’s important to do this before you install your floor. If you wait to paint the wood until after it’s installed, you run the risk of the floor warping.

frilayout4

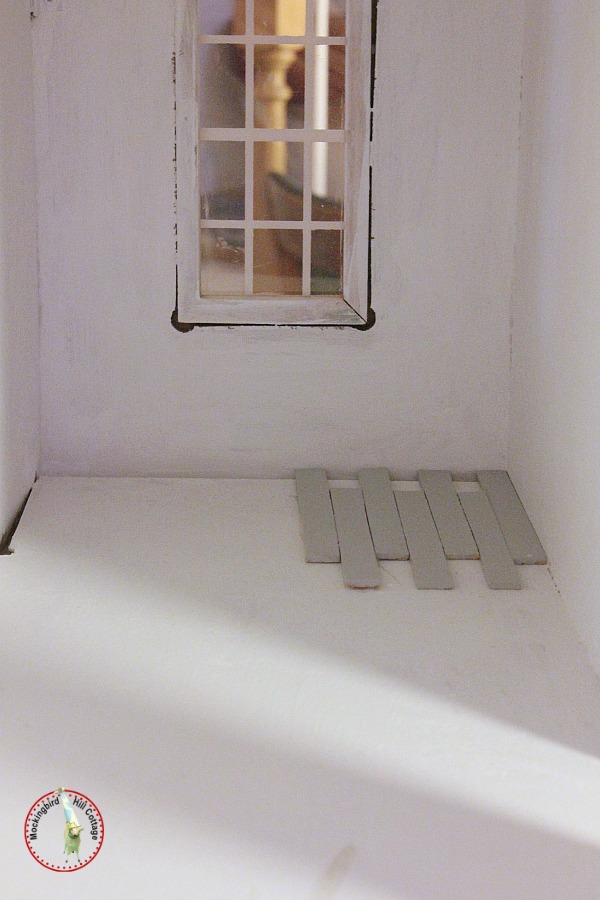
Then you begin the layout. (We’re working in the office/craft room and I’m choosing to go with a painted floor.) As you can see, I stagger the sticks just as you would in laying a real-life hardwood floor. This is the painstaking part of the process. I glue down the first row of sticks, then cut shorter lengths to fill in the spaces near the wall. Basically, I sit there and glue, cut, and glue again. (It’s messy – I find myself peeling dried glue off my fingers for several hours afterward.) It’s really like putting together a jigsaw puzzle.

I rescued this dollhouse when I found an ad for it on Craig’s List. There was water damage on the downstairs floors. It also wasn’t assembled correctly. I fixed what I could but short of taking it all apart, there were some quirks that I had to live with. See the area on the left where the wall and floor should join? They don’t. So I have to make some adjustments as I cut the wood for the floor.

frilayout2

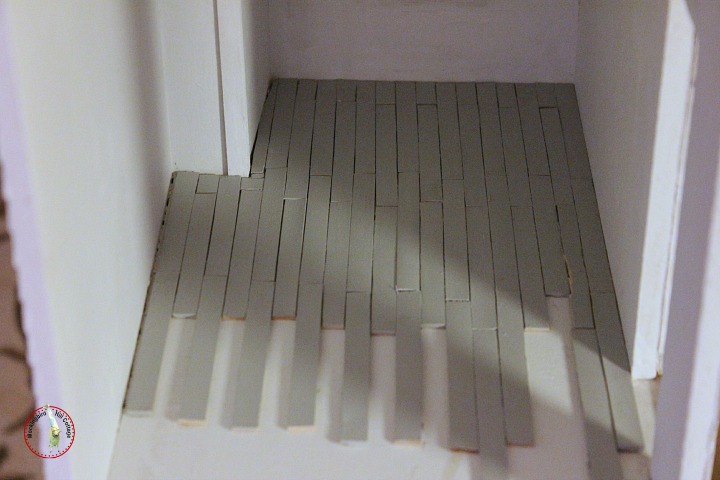
Sometimes I have to tweak the size of a stick – either the length or the width- to make the pieces fit together. Then I go back and touch up any areas of the floor that show the raw wood. I haven’t done that yet.

frilayout3

And there it is.

It’s slow, methodical work. This floor took about three or four hours to install, from start to finish. On the right you can see a stained wood version in the den.

There are faux-wood versions out there for those of you who are not interested in this sort of painstaking work. I wanted the real thing, however. And I wanted the look of floors installed long ago, that are slightly uneven, with gaps here and there. That’s the look in my real-life house, as well.

frikitchenlight

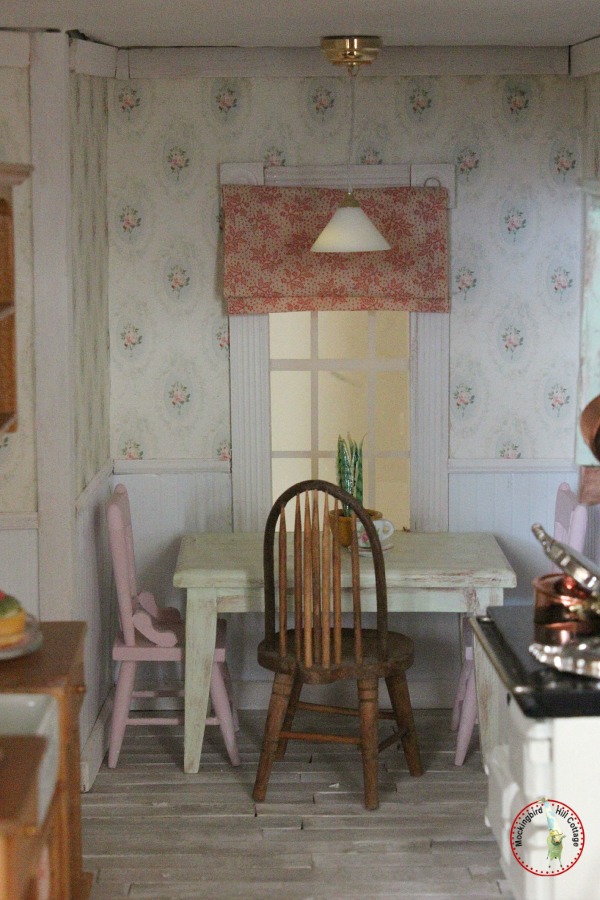
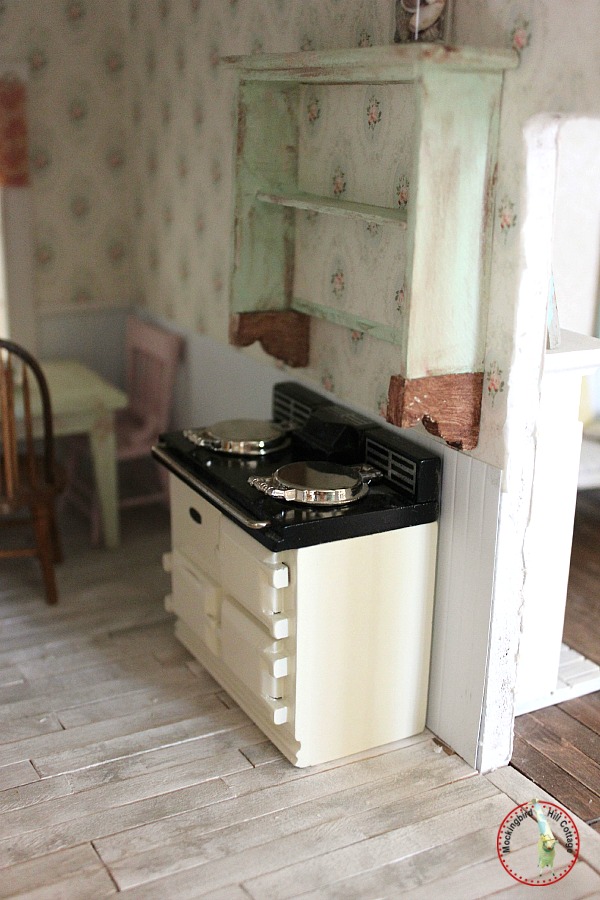
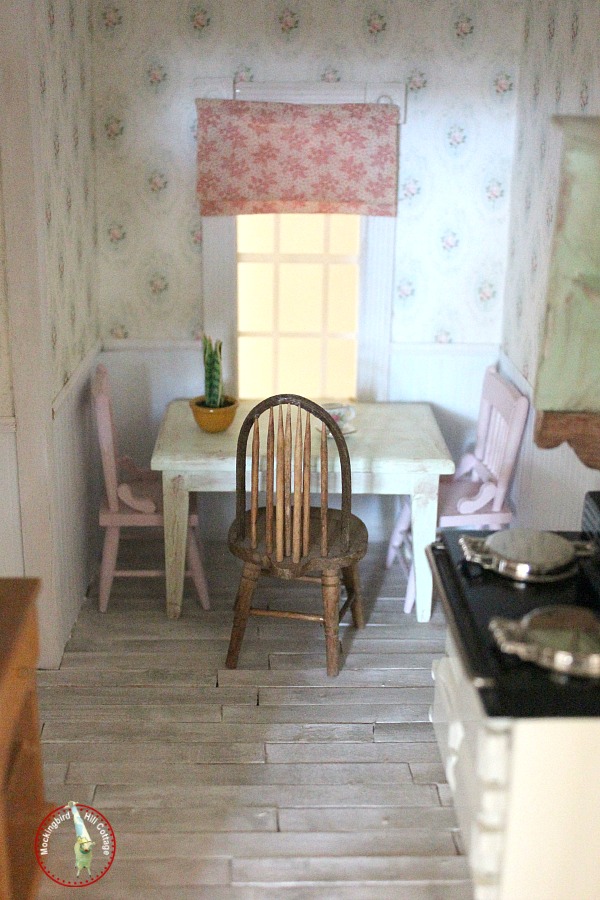
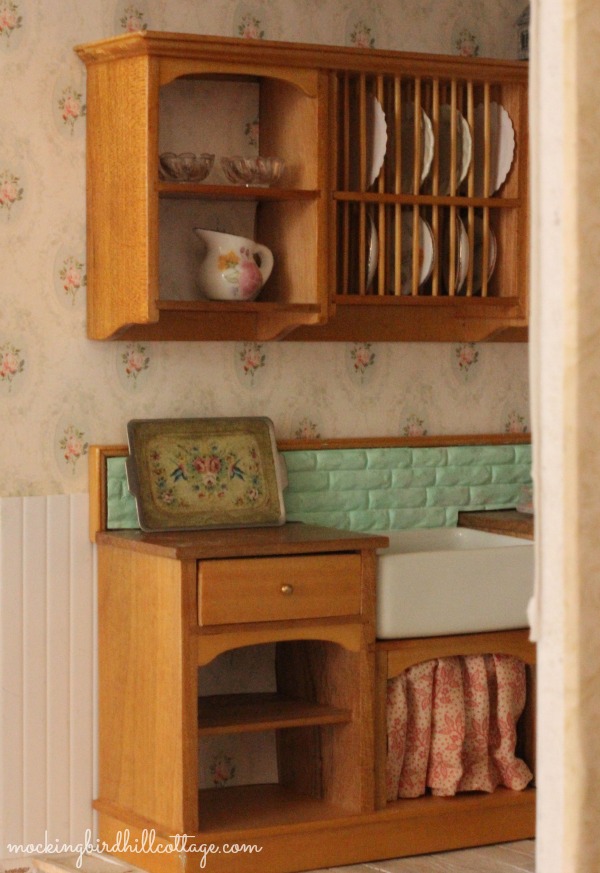
In the kitchen, I laid the floor in the opposite direction so there would be some contrast with the adjoining living room. It’s painted white and ‘aged’ with some gray.

Do you see my new light over the table? It’s a battery operated LED light that attaches to the ceiling with a magnetized base. Ingenious. When I want to turn it on, I can simply pull it from the base, flip a switch, then reattach it. I may paint that base. We’ll see.

Santa, I need a macro lens for my camera.

They aren’t cheap. I don’t think Santa will go for it.

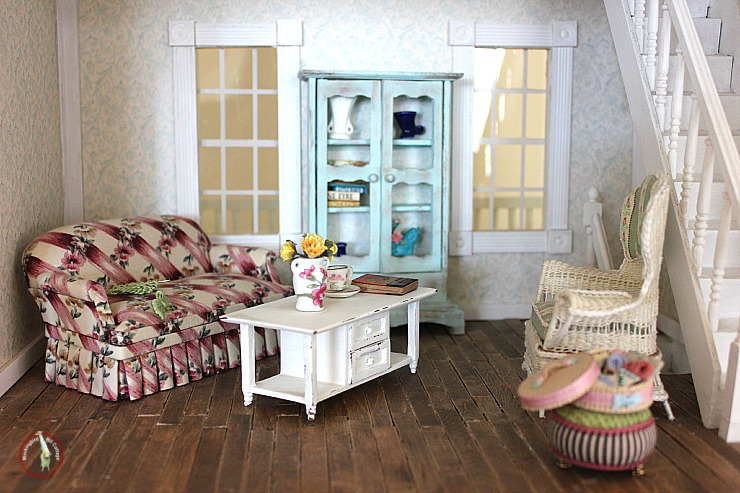
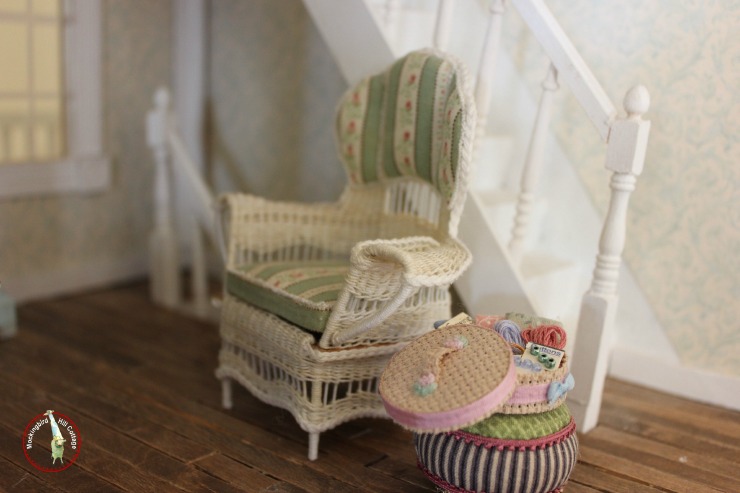
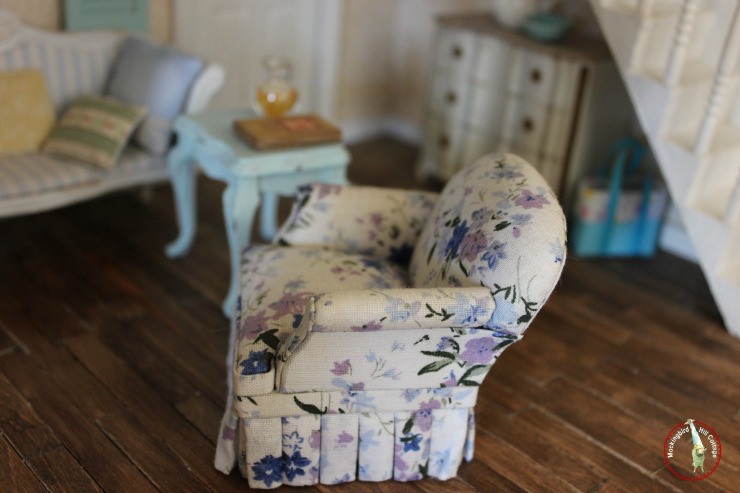
Do you remember this chair?

frichairbefore

This was an inexpensive chair; I spent about $3 for it. It came with the usual dark, shiny wood and was one of the first pieces that I painted. That white fabric, though pretty, wasn’t the look I was going for. Yesterday, I finally looked though my fabric and found this pattern:

frichair2

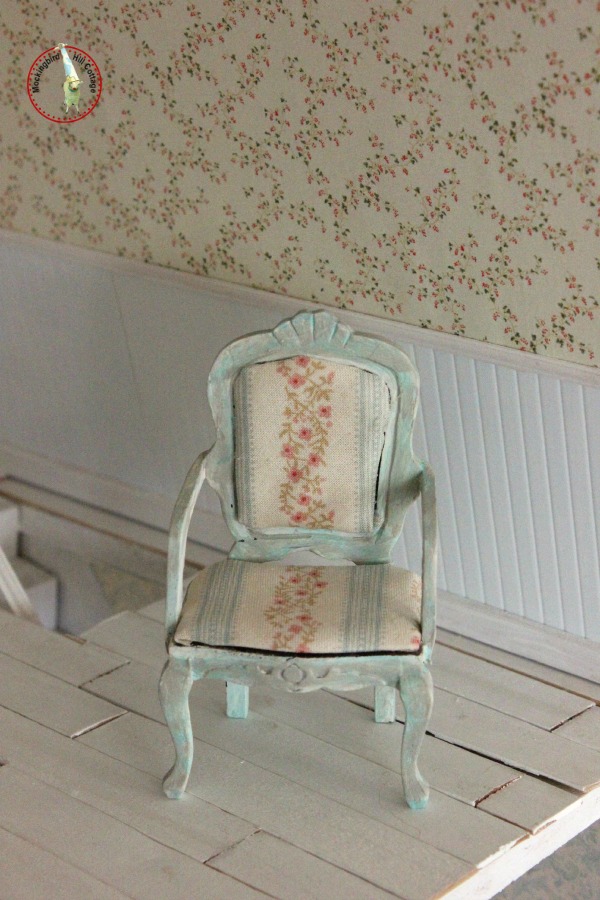
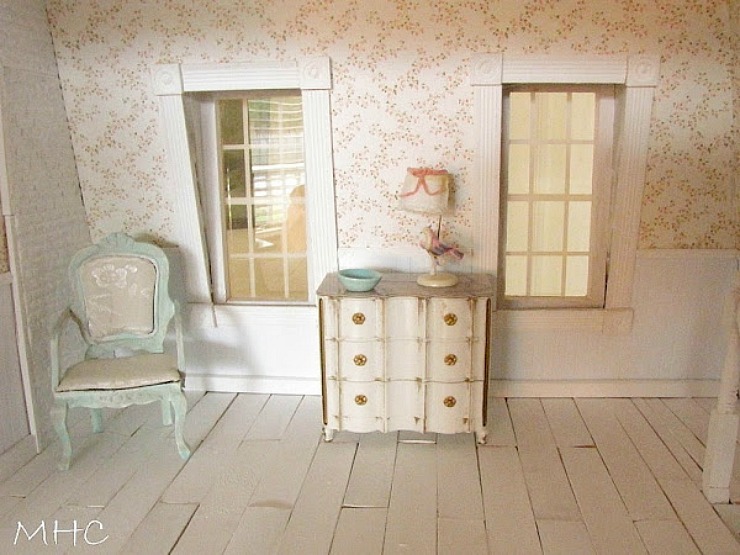
Be still my heart. This little sweetie will reside in the bedroom. Note the wide-plank floors. They were made with the tongue-depressor sized sticks. My thought was that the third floor was an attic that had been made into a bedroom and the owner simply painted the existing floors. Oh, there’s a method to my madness.

howtomakeahardwoodfloor1

Thought you might like a pinnable image. If you click through to Comments, you’ll find a Pinterest button at the bottom of the post.

I hope you’re all enjoying this Friday after Thanksgiving. We ate too much. But it was good!

Happy Friday.

ClaudiaSignature140X93

Filed Under: dollhouse, miniatures, tutorial 40 Comments

Furnishing the Dollhouse: How and Where I Find My Pieces

November 17, 2013 at 8:35 am by Claudia

I’ve had a couple of requests from readers for more information about the dollhouse; where I find my furniture and how to find furniture that doesn’t look cheap. First of all, let’s be honest here. I’m a hobbyist, not a miniaturist. I have met several incredible miniaturists through blogging and I will be sure to supply some links to their individual blogs. They are generous with tutorials and information and, believe me, once you start researching this kind of thing, you’ll quickly get hooked. As far as building any furniture from scratch; nope, I haven’t done that. I’d like to, but so far I am content with transforming the pieces I do find.

Dollhouse furniture runs the gamut in terms of quality. Some of it is flimsy and/or looks cheap. Some of it is incredibly intricate, made by true artisans, and very expensive. As you all know, my budget is, to put it mildly, minimal. So I’ve learned to look at pieces of furniture that have a finish I don’t like or look too shiny and think: What can I do with that?

Just like in real life.

Lots of the furniture you find will be darkish. Dark finishes are the norm on standard dollhouse furniture. If, like me, you have an aversion to that look, you will want to think about transforming the pieces you do find. Look for sturdy furniture that has good lines. The rest you can take care of with paint.

I’m going to share some photos with you and talk about the individual pieces – where I got them, how I transformed them – and then I’ll share some links with you at the end of the post.

This is what the fireplace looked like originally:

IMG_3572

It was a gift from Don one Christmas, bless him, and it was made out of molded plastic. I’m not necessarily crazy about plastic in the dollhouse (though there is one exception, you’ll see that later) and this wasn’t my style at all; it was very traditional and seemed too big for the living room. So I stashed it away for a couple of years until one day last year. I was thinking of ordering a fireplace, but since I always try to use what I have on hand, I grabbed this piece and, with nothing to lose, started painting it. Suddenly, it didn’t seem so large. I lined the back of the shelves with paper, actually, some paint chips in shades of aqua. The whitewashed look reminds me of the bricks on the chimney in my real-life living room. (Next up, I’ll be painting those andirons so they don’t look like extra-shiny brass.)

dollhouse6

Everything else on the fireplace came from a stash of things I had on hand. The painting had a brassy frame, so I whitewashed it. The aqua window frame is actually from a wooden piece from Michael’s that I took apart (you’ll see part of it in the kitchen) and I decided to paint it and use it as a piece of architectural salvage. The basket and flower pot were part of a bunch of miniature accessories generously sent to me by a miniaturist/blogger. I painted the pot and filled both pieces with flowers I had on hand. The armillary on the mantel was a gift from a dear reader of this blog. I fell in love with it but couldn’t figure out where it should go. Once I had the mantel, everything fell into place.

So you can take something that you think you don’t like, that might even look a little cheap, and make it into something beautiful for your dollhouse.

DHden

The blue china cabinet was an unfinished piece from Michael’s that a dear reader sent me, along with two other unfinished pieces. I sat down one day and painted and distressed it. Then I lined the back of the cabinet with the same wallpaper I’ve used on the walls in this room. A generic wood piece from Michael’s that is only a few dollars can be turned into something perfect for your dollhouse. It’s all about personalizing what you find.

As far as sofas and chairs go, I find a lot of them out there to be boxy and not at all believable. The pleats at the bottom are often way out of scale. Or they look far from comfortable. I found this sofa, which so reminds me of the vintage forties style that I love, on a wonderful site. Dollhouses and More. I also got the blue print chair that is in the living room from the same place. These pieces look real to me. I’m very picky about that. I’ve seen some gorgeous sofas and chairs made by my artisan friends, but I don’t have that skill set. The wicker chair was made by my dear friend Casey of Casey’s Minis. She is a true artisan and her blog is chock full of fabulous information. Lucky me, I won this chair in a giveaway and she made it specially for me. She also made that ottoman.

dollhouse3

There it is. There’s even a slot by the arm for magazines. I picked out the fabric from Casey’s stash.

That coffee table that you see in the den? My friend Marsha sent it to me, along with some other starter pieces, just after I found my dollhouse. Here’s how it looked (and you can get a peek at the dollhouse’s original colors):

IMG_3606

Very generic, rather modern looking – the kind of piece you see on every miniature website – with a glossy, dark finish. I got out the old paintbrush and came up with this:

DHcoffeetable

Now it looks more like me. I used some craft paint that I had on hand. This type of piece is readily available  on any miniature website and you can make it your own.

dollhouse4

This is the other chair that I got from Dollhouses and More. That blue table in the background? Same thing as the coffee table. I got it for free, it had a dark glossy finish and looked a bit cheap. But it’s sturdy enough and has curvy cabriole legs, so I painted and distressed it.

The 3 drawer dresser under the stairs has a little story. I found it at a local antique shop, along with some other furniture from the long ago Petite Princess line of furniture made by Ideal. When I was a kid, I wanted this stuff so badly! Never got it, alas, so when I saw it in the shop for $5, I grabbed it. It’s plastic, my friends. But it doesn’t look like it. The drawers open and the top looks like marble.

dollhouse7

I liked it so much I found another one for the bedroom on eBay. And that lamp is also from the Petite Princess line. It reminds me of my real-life parakeet lamp, so when I saw it on eBay, I snagged it.

dollhouse5

You can find a lot of wonderful miniatures on Etsy. This sofa came all the way from Italy, via Flora. This link is to her blog, but she has an Etsy shop as well. I first saw it on her blog but it had already sold, so she made one to order for me. You can find a lot of wonderful pieces this way. I have my eye on a couple of pieces from a miniaturist who lives in Denmark. It’s very exciting to get something in the mail all the way from Italy! And, just like in my real-life home, every piece in this dollhouse has a story. That makes everything more precious. I don’t want to furnish my dollhouse too quickly. I want to gather, play, try things.

A few more ideas for you:

DHaga

I took one of those Michael’s cabinets apart and used the top half for the shelving over the Aga. The same wallpaper I have used in the kitchen also backs the shelves. I just added the two cornice pieces yesterday. I wanted them to look different than the rest of the shelving, liked aged pieces that are being used as shelf brackets. I’m going to hang copper pots from a rod just below the shelf. You’d be surprised what you can do with an inexpensive wooden cabinet! The doors on the cabinet came off when I repurposed it and I couldn’t use them. You saw one of them on the fireplace mantel. I have another one that I plan to use in the office/craft room.

There are a few pieces in the dollhouse that I saved my pennies for, or requested as a birthday present. The sofa from Italy is one. This Aga oven is another. It’s made out of wood and porcelain, by Reutter, and I love it. I never wanted any other kind of oven in here.

The dollhouse has some of things I dream of but could never afford in real life. As it should be!

DHkitchen

I saw these two pieces, priced at about $34 each and I knew I had to have them. I can’t remember how I maneuvered this one. Maybe one was from Don and one was bought using birthday money from my parents? Something like that. How could I pass up the farmhouse sink and the open shelving and the plate rack? How could I say no? A few investment pieces, beautifully made, are worth it. These are made by JBM Miniatures. I’ve recently seen them on both Miniatures and New England Miniatures, two great websites. The drawers open, by the way.

I was going to paint them, but the wood is so beautifully finished that I decided to keep them as is. The tile backsplash was added by yours truly, made out of the same material I used on the bedroom chimney. I made the curtain under the sink. I have a faucet on order – it should be coming this week. The china dishes are okay, I’m not crazy about them, but they were very inexpensive and they’ll do until I find something I like better.

The tray is from Lea of Atelier Lea – it came all the way from Paris! Lea is the most amazing miniaturist. She has a shop in Paris and she’s written a book that I want so badly! But the cost to ship it here from France is too much for me at the moment.

DHkitchentable

Oy, Photographing the back of the kitchen is like taking a picture inside a tunnel! That table is a generic inexpensive table with a glossy finish that I ordered from a website. It’s made of wood. I painted it and distressed it. The pink chairs are also made of wood. Still not sure about that color I chose – they might change in the near future. I found the other chair on a shelf in an antique store. It was three dollars. I couldn’t pass it up. I added it to the kitchen table, because you all know I don’t like too much match-matchy. I made the roman shade on the window.

Finally, this piece came to me via Marsha:

DHbathroomcabinet

She was attending a miniature show in California with my friend Jill and, at my request, snagged this for me. Isn’t it great? It’s going to stay in the bathroom, I think, to hold towels. If not, it’s going into the office/craft room. I’m not sure. But my point is that there are Miniature shows all over the country, with amazing work by miniaturists on display. You can buy pieces there that you won’t see anywhere else. My goal next year is to get to one of these shows – there’s so much incredible work out there. You can google ‘miniature shows’ and you’ll find all the information you need.

One warning, just because a piece says it’s to scale, in this case 1:12, doesn’t always mean it’s exactly to scale. There is wiggle room there, but I’ve been burned a few times, especially with anything vintage. I suspect scale has become more rigorous in the past few decades. Just be aware of that.

Oh, the wallpaper is from Itsy Bitsy Mini. They have an amazing variety of patterns.

The floors are made out of coffee stirrers and craft sticks, depending on the size of the planks.

Here are some links for you. First, some websites I’ve ordered from and/or find valuable:

Dollhouses and More
Miniatures
DHE Minis
Dejoux Miniatures
The Little Dollhouse Company (Canada)

There are also several websites in England which have beautiful miniatures and also carry wonderful kits that I’d like to try from Mini Mundus.

National Association of Miniature Enthusiasts
CDHM (lists upcoming miniature shows, has tutorials)

Now, for some blogs I think you’d like:

Christel Jensen
Casey’s Minis
A Beautiful World
Sabs Mini Interiors
Liberty Biberty
It’s a Miniature Life
Make Mine Mini
Une Petite Folie
Cynthia Lauren Sperin

These bloggers are so talented. They build things, they make incredible furniture, they are amazing. And inspiring.

Whew! This was a long post. Search on websites, search on Etsy, search on eBay. If your budget is tight, as is mine, look at inexpensive pieces that you can alter or paint and make your own. Have fun! I have a lot more to do on the dollhouse and I’ll be sharing what I learn with you along the way.

Happy Sunday.

ClaudiaSignature140X93


Filed Under: dollhouse, life, miniatures 28 Comments

Improvements to the Bedroom and the Dollhouse

February 7, 2013 at 8:24 am by Claudia

The painting continues. I have this small buffet from the forties that I use in the bedroom – I store a lot of my sweaters inside the cabinet doors. Old house = very little closet space. It’s in the same darkly stained wood that the kitchen island was when it first arrived. The difference being that I painted the kitchen island long ago. But this little bugger was still in it’s badly damaged, missing veneer, yucky state. As it sits directly across from the bed, I would look at it every night as I sat in bed reading and get depressed. Here’s a glimpse of the way it looked:

before

And this photo somehow makes it look better than it was.

This time I primed first. It still took 2 coats – 3 in some places. Again – Chalk Paint is just okay. I have a gallon of the paint I used on the kitchen island that has been sitting around here a long time. I’ve used it for other projects. I repaint the island with it every year. I still have more than half a gallon left. It cost less than a quart of Chalk Paint.

But I have the can of Chalk Paint. So I’m going to use it.

repaint1

The painted version. I love the lighter look. That dark piece of furniture just sucked the energy out of the room. Oh, it looks so much better – but in the interest of being totally upfront with you, I must also show you what is on top of this piece.

repaint2

Our huge, black monolith of a television that we’ve had for, what, about 16 years?

It still works.

So I can’t justify getting rid of it and buying a new one. We don’t watch all that much television in the bedroom – usually only when one of us is sick in bed. But there it is. I have put the framed “Visiting Santa” photos in front of the crazy cable cords until I find a way to hide them.

Now, on to Don’s bedside table, which is really an old oak music cabinet. And his dresser? Talk about missing pieces of veneer! I don’t think every piece will be this color, but they will all be painted. I want this room to look a lot more coordinated.

On to another topic. In the miniature world, there is a well known miniaturist in Paris, Léa Frisoni. Léa constructs the most amazing miniatures and has a shop as well. She has written a book, Le Grand Livre de La Maison Miniature, that I very much want to buy someday. In it she gives instructions on how to create the gorgeous pieces and houses that she is known for. (I almost bought it through Léa’s Etsy Shop, but it’s a big book and the shipping costs were very high.) Someday. Léa blogs at Un Jour à la Campagne (A Day in the Country).

When my dream trip to Paris happens sometime in the future, I will be visiting Léa’s shop, of that you may be sure.

In the meantime, I wanted to have a little creation of Léa’s in my dollhouse. It arrived yesterday.

lea1

Long, long ago, I had a French pen pal. She sent me a gift and it was in a paper bag like this. I remember thinking that even paper bags from Paris seemed more chic than our paper bags. And they still are.

Can you spot the new addition to my kitchen?

lea2

If you guessed the tray, you’re right! It reminds me of the tole trays that I love so much. Yay! I have a little bit of Léa in my house!

How come my dollhouse looks so much better than my real house?

Okay. Have to go. I have to run lots of errands today because we are getting a mega snow storm tomorrow.

Crap.

Depending on what station I listen to, the amount of snow coming for my area seems to be anywhere from 6 inches to over a foot. The Weather Channel is practically frothing at the mouth, they are so excited. I’m sticking to my little local cable news channel where the weatherman actually seems to be exercising some caution in the area of predictions. He’s not hyping everything. A rarity nowadays. In the meantime, I’m trying to take care of things before the snow arrives.

Update: I deleted the earlier part of the post saying Dad was doing well. He’s not doing so well today. He seems to be in some pain and his lung is bothering him. We’re not sure what’s going on right now. I’ll keep you updated.

Happy Thursday.

signature2

Filed Under: decorating, DIY, dollhouse, miniatures 54 Comments

  • « Previous Page
  • 1
  • …
  • 93
  • 94
  • 95
  • 96
  • 97
  • …
  • 99
  • Next Page »
  • Email
  • Instagram

Welcome!

Welcome!

I live in a little cottage in the country with my husband. It's a sweet place, sheltered by old trees and surrounded by gardens. The inside is full of the things we love. I love to write, I love my camera, I love creating, I love gardening. My decorating style is eclectic; full of vintage and a bit of whimsy.

I've worked in the theater for more years than I can count. I'm currently a voice, speech, dialect and text coach freelancing on Broadway, off Broadway, and in regional theater.

Thanks for stopping by.

Searching?

The Dogs

The Dogs

Scout & Riley. Riley left us in 2012. Scout left us in February 2016. Dearest babies. Dearest friends.

Winston - Our first dog. We miss you, sweetheart.

Lambs Like to Party

Lambs Like to Party

A Note

Thanks for visiting! Feel free to browse, read and enjoy. All content is my own; including photos and text. Please do not use anything on this site without permission.

Disclosure/Privacy Policy can be found in the Navigation Bar under ‘About MHC.’

Also, I love receiving comments! I do, however, reserve the right to delete any comment that is in poor taste, offensive or is verging on spam. It’s my blog. If you’re a bot or a troll you’ll be blocked. Thanks!

Archives

All Content © 2008 - 2026 Mockingbird Hill Cottage · Log in