I shudder at my temerity in presenting any sort of miniature tutorial. But then I remember that a lot of you are just like me. We’re women who love the idea of having our very own dollhouse to decorate. We’re not miniaturists. We just want to putter and play. So, without further ado, here is a little tutorial on putting in a hardwood floor in your dollhouse. Every room in the dollhouse, save for the bathroom, has one. I’ve used a wood stain in some of the rooms and a painted floor in others.
When I was ready to install my first floor, I went to a restaurant supply store and bought a big box of coffee stirrers. However, when I got them home, I quickly realized that they were too narrow for the dollhouse. (Anyone need some coffee stirrers?)
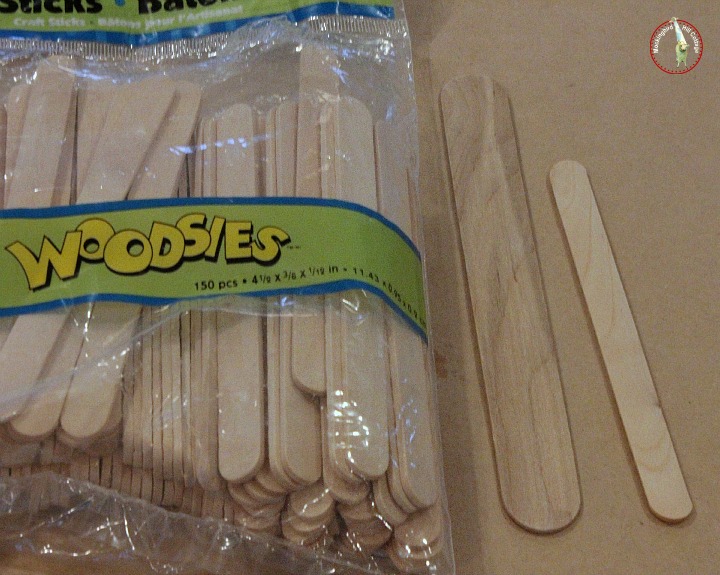
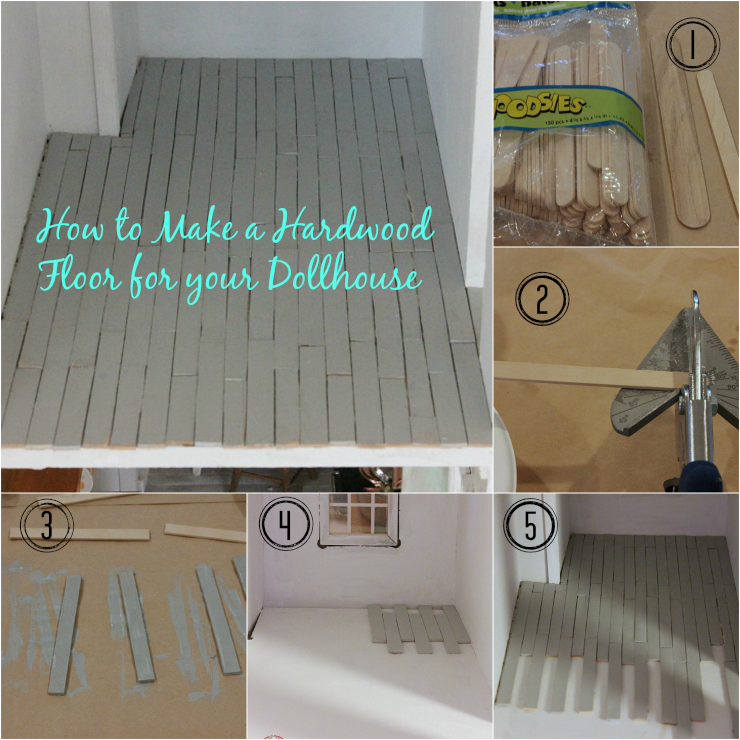
So I went to Michael’s and bought some wooden sticks. The stick on the right is the size of a popsicle stick. The one on the left is tongue-depressor sized. I used that one in the bedroom.
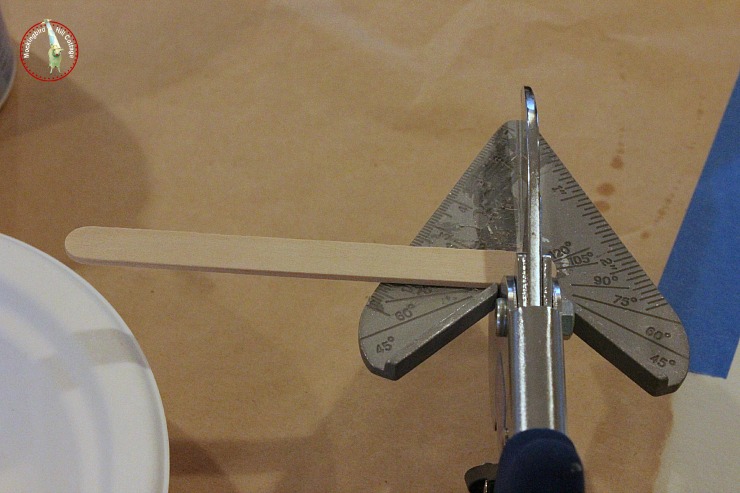
Using my favorite tool, the Easy Cutter, I cut off the rounded ends of the sticks. (The Easy Cutter is a must have if you’re going to be cutting wood to make moldings or baseboards or flooring. Or just about anything. You can find one at Miniatures.com.)
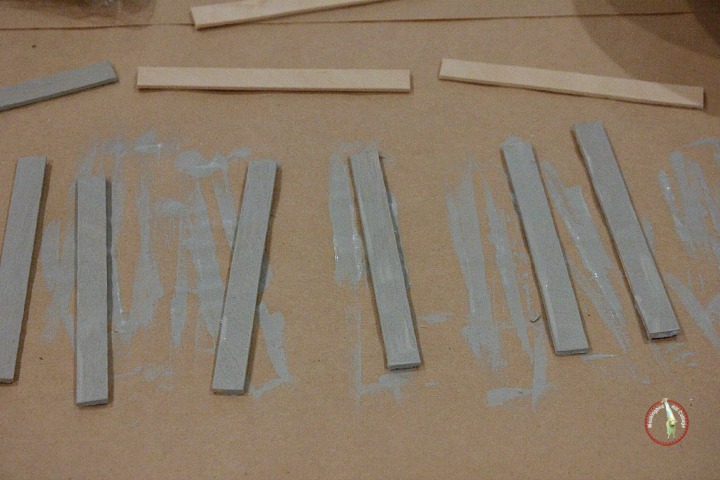
Then I paint or stain the sticks. It’s important to do this before you install your floor. If you wait to paint the wood until after it’s installed, you run the risk of the floor warping.
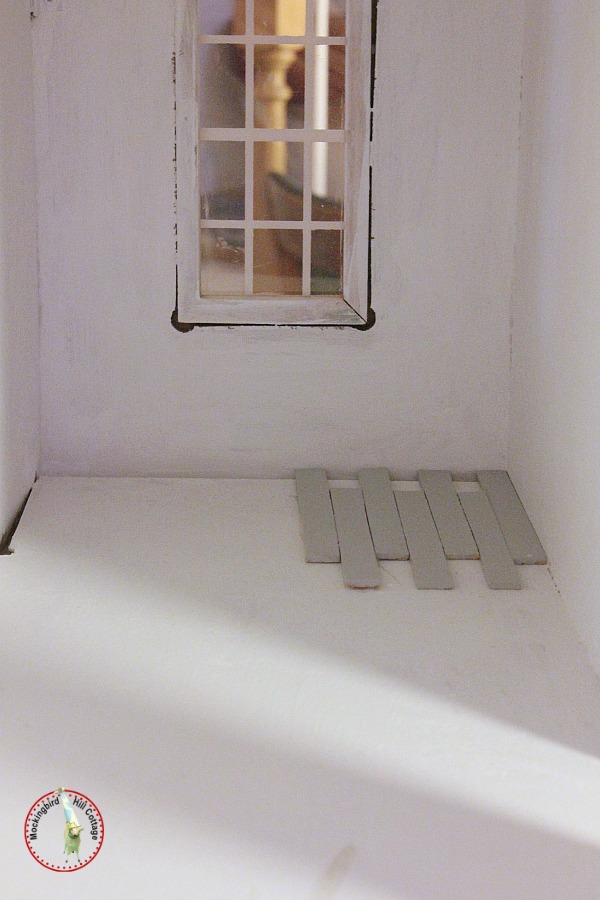
Then you begin the layout. (We’re working in the office/craft room and I’m choosing to go with a painted floor.) As you can see, I stagger the sticks just as you would in laying a real-life hardwood floor. This is the painstaking part of the process. I glue down the first row of sticks, then cut shorter lengths to fill in the spaces near the wall. Basically, I sit there and glue, cut, and glue again. (It’s messy – I find myself peeling dried glue off my fingers for several hours afterward.) It’s really like putting together a jigsaw puzzle.
I rescued this dollhouse when I found an ad for it on Craig’s List. There was water damage on the downstairs floors. It also wasn’t assembled correctly. I fixed what I could but short of taking it all apart, there were some quirks that I had to live with. See the area on the left where the wall and floor should join? They don’t. So I have to make some adjustments as I cut the wood for the floor.
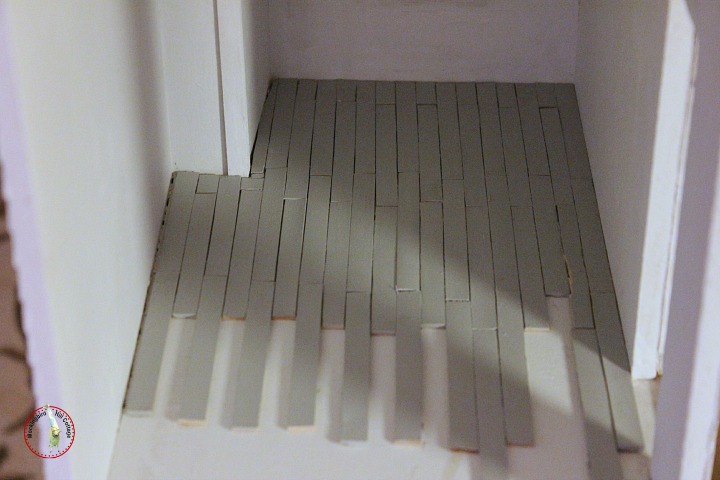
Sometimes I have to tweak the size of a stick – either the length or the width- to make the pieces fit together. Then I go back and touch up any areas of the floor that show the raw wood. I haven’t done that yet.

And there it is.
It’s slow, methodical work. This floor took about three or four hours to install, from start to finish. On the right you can see a stained wood version in the den.
There are faux-wood versions out there for those of you who are not interested in this sort of painstaking work. I wanted the real thing, however. And I wanted the look of floors installed long ago, that are slightly uneven, with gaps here and there. That’s the look in my real-life house, as well.
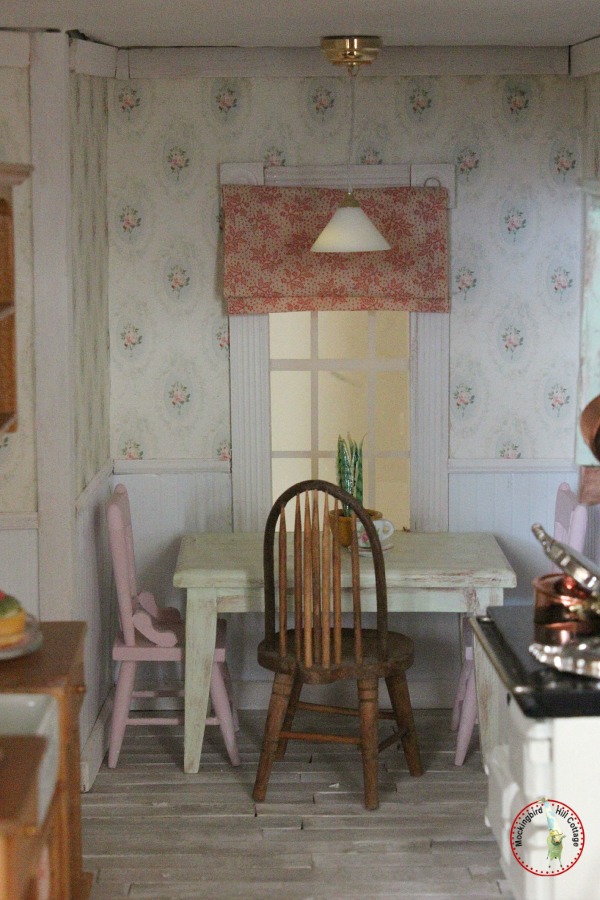
In the kitchen, I laid the floor in the opposite direction so there would be some contrast with the adjoining living room. It’s painted white and ‘aged’ with some gray.
Do you see my new light over the table? It’s a battery operated LED light that attaches to the ceiling with a magnetized base. Ingenious. When I want to turn it on, I can simply pull it from the base, flip a switch, then reattach it. I may paint that base. We’ll see.
Santa, I need a macro lens for my camera.
They aren’t cheap. I don’t think Santa will go for it.
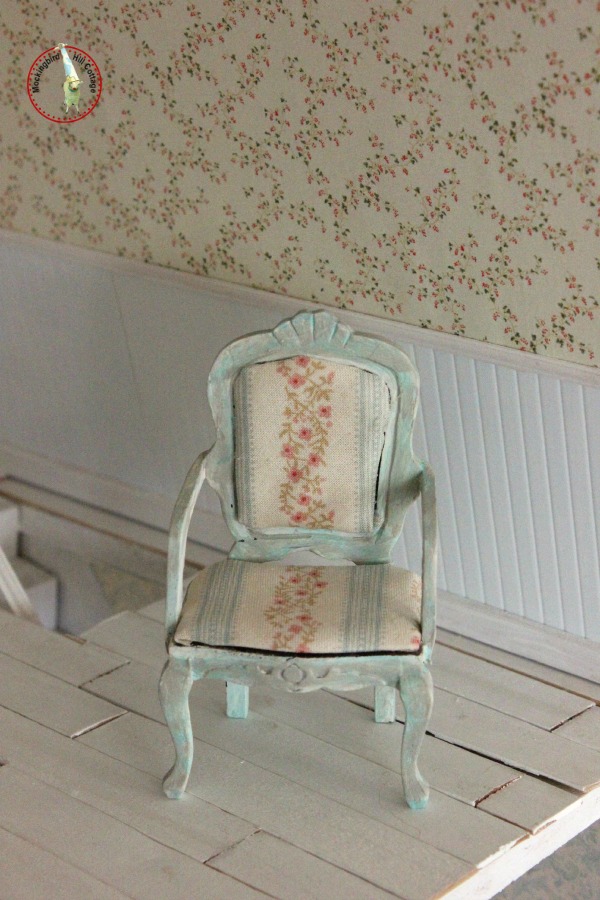
Do you remember this chair?
This was an inexpensive chair; I spent about $3 for it. It came with the usual dark, shiny wood and was one of the first pieces that I painted. That white fabric, though pretty, wasn’t the look I was going for. Yesterday, I finally looked though my fabric and found this pattern:
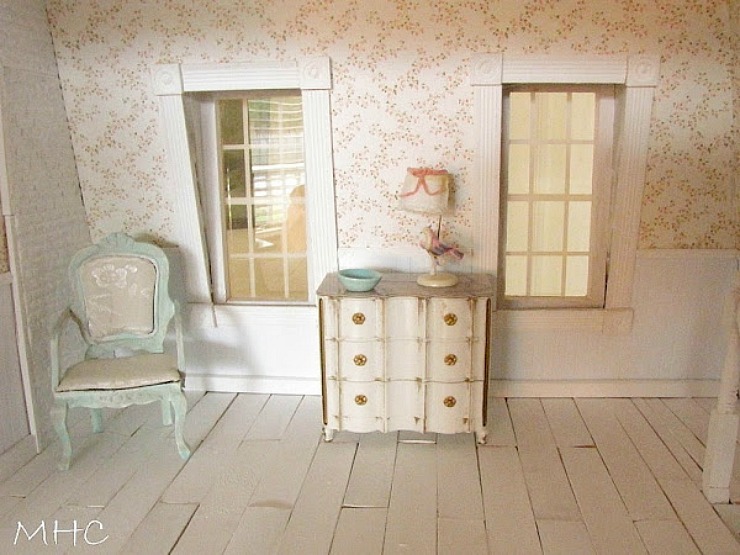
Be still my heart. This little sweetie will reside in the bedroom. Note the wide-plank floors. They were made with the tongue-depressor sized sticks. My thought was that the third floor was an attic that had been made into a bedroom and the owner simply painted the existing floors. Oh, there’s a method to my madness.
Thought you might like a pinnable image. If you click through to Comments, you’ll find a Pinterest button at the bottom of the post.
I hope you’re all enjoying this Friday after Thanksgiving. We ate too much. But it was good!
Happy Friday.


this is quite amazing….I never knew there was so much work involved to these! :)
There is, there is! But it’s fun!
I absolutely love how your floors turned out! My fondest memories are of playing dollhouse with my sister. Even today I will sneak upstairs at my parents house and decorate the little house ;) Lovely!
Dollhouse are so wonderful, Tricia. I find I like them even more as an adult!
I have always admired doll houses and miniatures and thought that when I retired I would put a doll house together. Well, I retired last March and reading your posts have inspired me to get serious about it. I love how you are working on the details of each room…that floor looks great!
Go for it, Debbie! You’ll have such fun!
I am just loving this dollhouse. Your eye for detail is immaculate just as it is in your big(ger) house.Thank-You! I Love the floors! When I was growing up, my Grandpa would paint the floors in their little house,every few years. My Grandmas favorite color floor? RED! -Judy A-
Now I’m thinking I should have painted that floor red, Judy!
Claudia, He would have painted it pretty much any color to make her Happy! -Judy A-
I bought 3 different sizes of sticks a few months ago at Hobby Lobby but have not worked up nerve to start laying the floors yet. Around where I grew up people used what they had. My great grandpa built the house when he and great granny got married. All Oak, to really last. My grandpa got the house, and he built on a bedroom every time he had a kid. He had 7 kids. He got the wood by tearing down old barns or houses for people – for the wood. Those rooms lasted 3 generations, although when they were built his thinking was they could be made with the old wood cause they only had to last to raise his family. The house is now back to it’s original 4 rooms. The hardwood floors in some of the rooms were beautiful. Because of the scrap wood that came from so many different places, they were assorted colors. Many different shades of browns and grays. Which my grandma kept waxed to almost a mirror shine. Some day that is what I want my dollhouse bedroom floor to look like. I also love that painted hardwood floor that you did, and I will do that in one of the rooms. Mostly right now I have rugs hiding the unfinished floor.
Catch ya later.
Smiles to you.
Linda
It would be so neat for your dollhouse to have floors like the ones your great grandpa made! What a neat idea!
I’ll be getting rugs for the living room, den, bedroom and office. But that will be down the road.
Adorable :)
Thank you, Erika.
I love the way you arrange the wood so they look like real house floors..I like the cutting tool also!
It’s incredibly handy, Nancy. I don’t know what I would do without it!
I’m going to try this on my dolls house. I love the old uneven floor look. I’m doing my dolls house to look like the Waltons farm house. Thanks for the idea,
You are most welcome, Elaine. Have fun!
So cute. I remember having a dollhouse as a kid and not really being interested in it. Then my sister made me a Barbie house and made the furniture from things around the house. I loved that and played with it endlessly. Your house is sparking an interest in me. I wonder if I can find room for one.
Since I keep coming up against my Mom’s objections to the “decorating” I want to do, maybe a doll house would fulfill a creative need. J
I bet it would, Julie. It would be just for you.
I find it so fascinating how you have to do the floors…lots of detail I’d never thought about! Love that little easy cutter! And I definitely ate too much yesterday…but it was so good, if I do say so myself! ;)
The easy cutter is easily the most used tool that I have.
I love when you post about your dollhouse. I have been into dollhouses the past 5 yrs. Still working on mine, almost finished and purchased another 2 Christmas’s ago. I love your ideas and admire your work. Thank you so much for sharing. I try to read your blog every day. Love fr Illinois, Kathy C
I have another dollhouse kit – 1/2″ size – sitting around. I’ll build it when I finish with this one,
I dug outumy doll house things I had kept when I gaveumy house Way! Oh my I won’t need a lot to refill one when I find one! Thanks for renewing my interest in such a treasure
You are most welcome, Karen. It’s my pleasure!
Can’t wait to start on mine – but it will probably have to wait until after the first of the year. Am going to go order me one of those cutters. John & I were just talking about how I would cut all of those popsicle sticks. He didn’t think he had a saw that would saw that small and fine. Thanks for the link!
Happy Day my friend.
Judy
You will love that cutter, Judy. It’s worth every penny. And you can cut wood on an angle, too. Have a wonderful day my friend.
Oh my it takes a long time to put down a wood floor In a doll house. It looks terrific.
It sure does, Dawn. I have to be in the mood to do it. I put this floor in when the weather was so bad the day before Thanksgiving.
Claudia those are adorable, the wood floors I mean. I’ve lived in charming old apartments that had floors like that, gaps and cracks, and uneven, I loved them. But I always wore slippers.
Now as for the macro lens…I think I might have a inexpensive solution for you. Click it up a notch had blogged about these macro filters…not perfect, but at around $10…they will do the trick for now.
http://clickitupanotch.com/2013/10/macro-filters/
And they are available from Amazon.
Have fun with them.
Jen
Oh boy, Jen! Thanks so much. I’m going to check this link out. xoxo
Great tutorial!!! One of the first things I noticed about your dollhouse and mentioned to you was the floors. They are magnificent and they look so real and cozy. I love the look. The chair looks really nice recovered… more like you. Details in the kitchen are great… the light and the pots hanging over the stove! Love it all Thanks Claudia
SueZK
Thanks so much, Sue!
Now, if it was just that easy…for a real house!!!
Addie
Your doll house is just adorable. The chair is too cute, love how you painted it.
Love your dollhouse, Claudia! Isn’t it funny how working on something you love isn’t really “work” at all?
Claudia –
This looks wonderful. You have done a great job with the floors!
I was wondering what was involved… Glad you mentioned painting or
Staining first before gluing them. I wouldn’t have thought of the floor bowing.
Good point.
Cute chair love the fabric. Still deconstructing have started rebuilding yet on mine. But I’m learning so much from you! Pat
Impressive! I was admiring the floors I had no idea you crafted them. Thanks for showing the walk thru.
i absolutely love your doll house! Maybe I should ask for one for Christmas. I’ve always loved anything whichis minature and your dollhouse and furnishings look so real. Thanks for all of the great ideas. Now I just need a dollhouse!
i love those floors ! i have wanted to make a doll house for years now, i think I will order one for myself this Christmas. i’m so glad to find out about that cutter, not knowing what tools to use is one of the things that has held me back. thanks for sharing with us.