Mockingbird Hill Cottage

Mockingbird Hill Cottage

  • About MHC
    • Disclosure
  • Dollhouses/Minis
    • Hummingbird Cottage
    • The Studio (Formerly TSP)
    • Dove Cottage
    • The Lake House
    • The Folk Art Dollhouse
    • The Modern Dollhouse
    • Dollhouse Source List, Information and Tutorials
  • On the Road
  • Collecting
    • Roseville Pottery
    • McCoy Pottery
    • Egg Cups
    • Bakelite
  • Press
  • Privacy Policy
You are here: Home / Archives for DIY

After the Glue Dries: A Mini Christmas Tree

December 10, 2014 at 9:50 am by Claudia

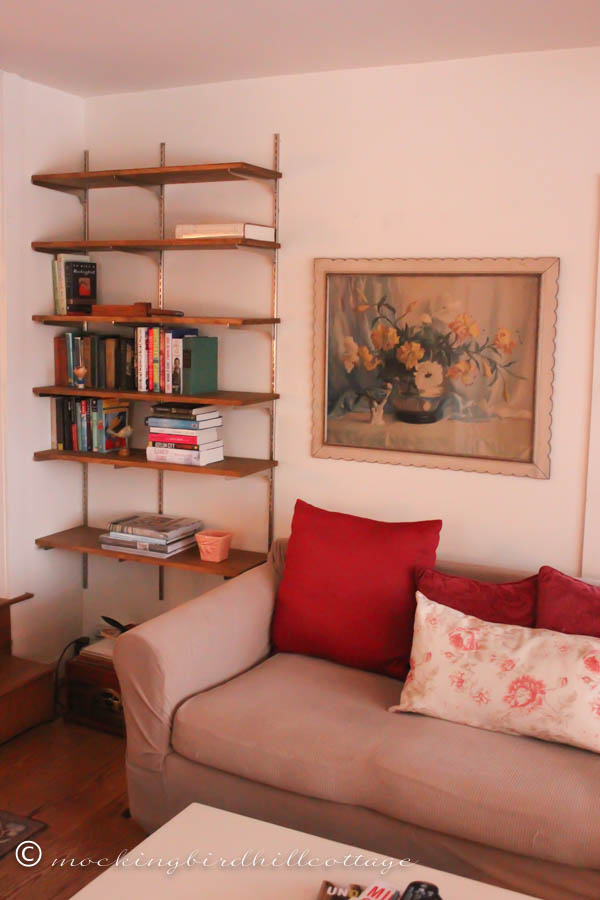
First up: My AOL email address was hacked. I think it was my AOL address. It’s hard to tell because it looks like the email is coming from me, but it’s actually coming from another address. I’m going to change the password of all my email addresses today. I’ve already changed the AOL password.

So if you get an email from me with a link, don’t open it.

We haven’t decorated the tree yet. Why? Because I was working on a project or two for the dollhouse and Don was busy and by the end of the day we both agreed that today would be a better choice.

The biggish project for the dollhouse involved a bottle brush tree, a product called lycopodium, lots of glue, and lots and lots of patience.

For the past couple of Christmases, I’ve used a small white bottle brush tree in the dollhouse living room. I’ve never liked it precisely because it looked like a bottle brush tree with no depth or irregularities, not to mention the fact that it was too short. You know I strive for realistic looking minis in this dollhouse. This year, I happened upon a couple of tutorials that showed me that I could, in fact, have a real looking Christmas tree. I’ll link to the one I used at the end of the post.

I found a green bottle brush tree last week. It wasn’t easy. Michael’s, for example, had sold out. It had to be a certain height and width, which made the search all the more challenging. I finally found one at a local market.

minichristmastree1

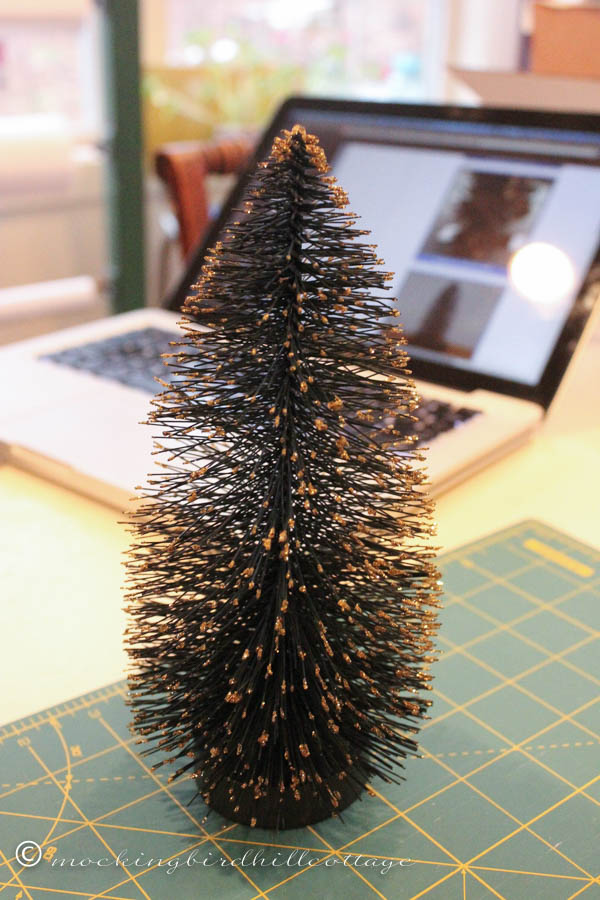
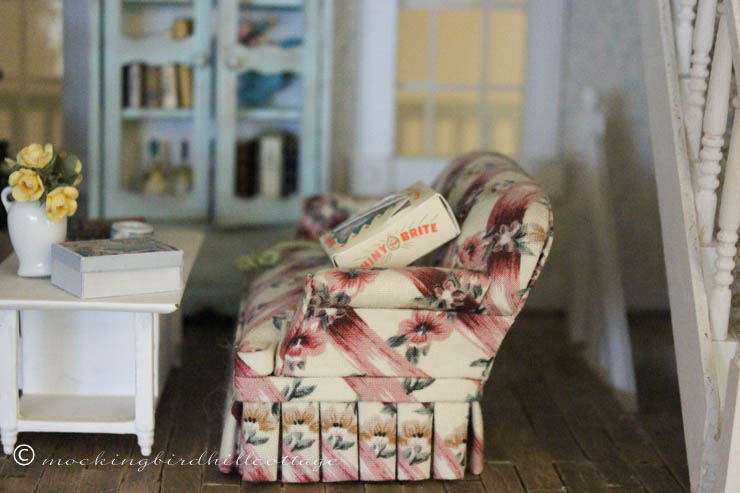
There it is. I had to snip off all the glitter at the ends of the branches and I ended up trimming the whole thing so it was a bit narrower.

Next, a bag of lycopodium, which I ordered from miniatures.com. Lycopodium is preserved princess pine – so it’s real and you can use it for trees, wreaths and garlands.

minichristmastree3

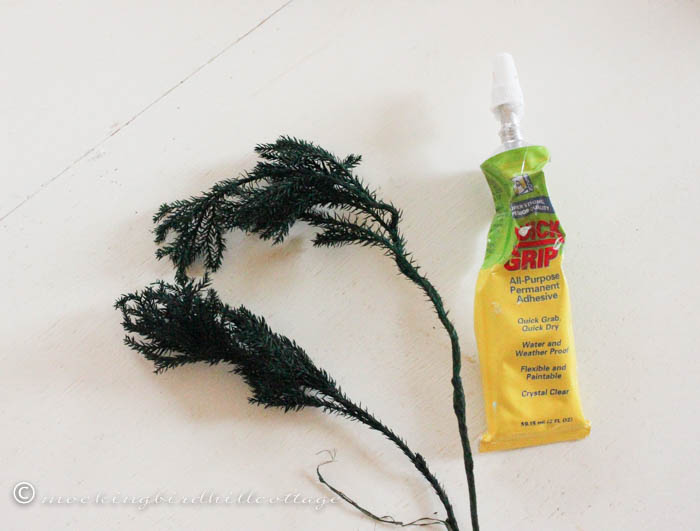
It comes in a bag and there’s lots of it. There’s more than enough on hand to make more than one tree.

You also need glue. I used my favorite, Quick Grip.

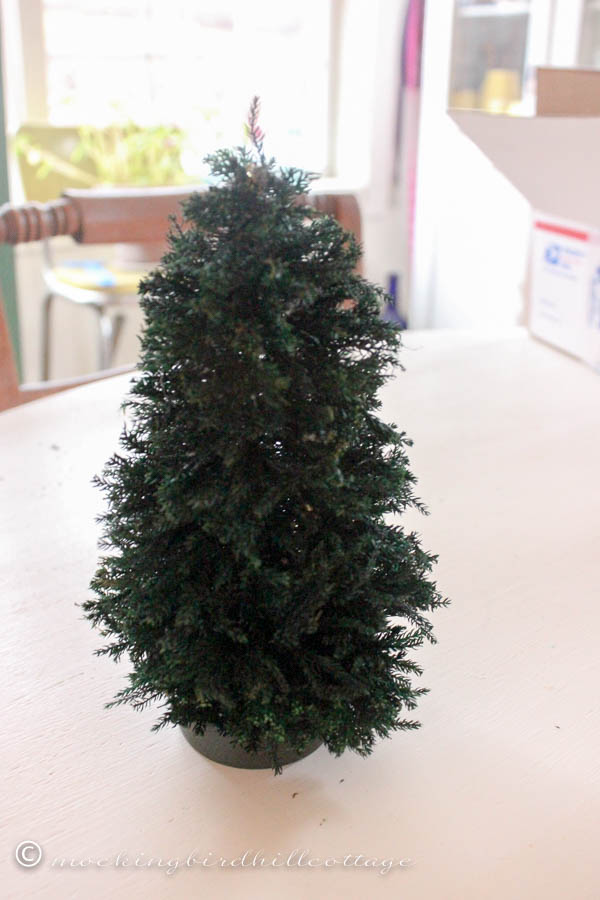
Basically, you measure how long you want the bottom branches to be. They need to extend beyond the bottle brush branches. Then you start cutting pieces of lycopodium to match that length. Then you add a drop of glue to each branch and start inserting them in the bottle brush tree. The tutorial advised filling in the bottom first, then doing the middle, then filling in the rest of the tree.

I deliberately clipped the lycopodium branches in an irregular manner. I wanted the tree to look real.

It’s somewhat tedious work. It’s messy. It took me a couple of hours to add all the pieces. And, if you’re at all like me, you’ll end up with glue all over your fingers and you will spend the rest of the day peeling it off the aforementioned fingers.

But gosh, does it look great in the end!

minichristmastree2

I’m so excited about this tree! Now I have to figure out how to decorate it.

I’ve got ideas.

minichristmastreeinden

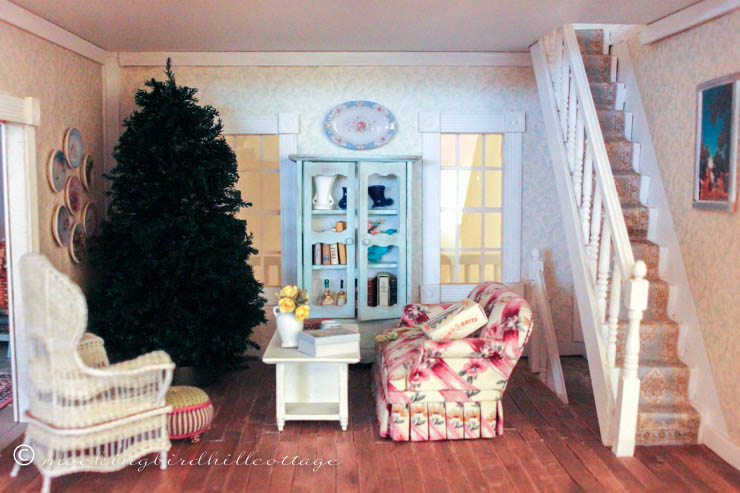
It’s too big for the living room because of the fireplace, so Caroline decided to put it in the den this year. And, of course, furniture had to be rearranged.

Note: the rest of the runners for the stairs have been installed.

minichristmastreeinden2

Caroline’s getting ready to decorate.

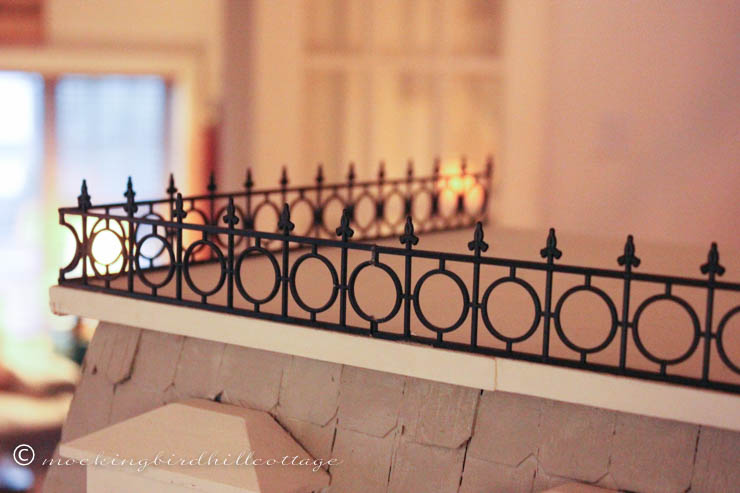
Finally, in preparation for the rooftop garden, some ironwork has been installed.

miniironwork1

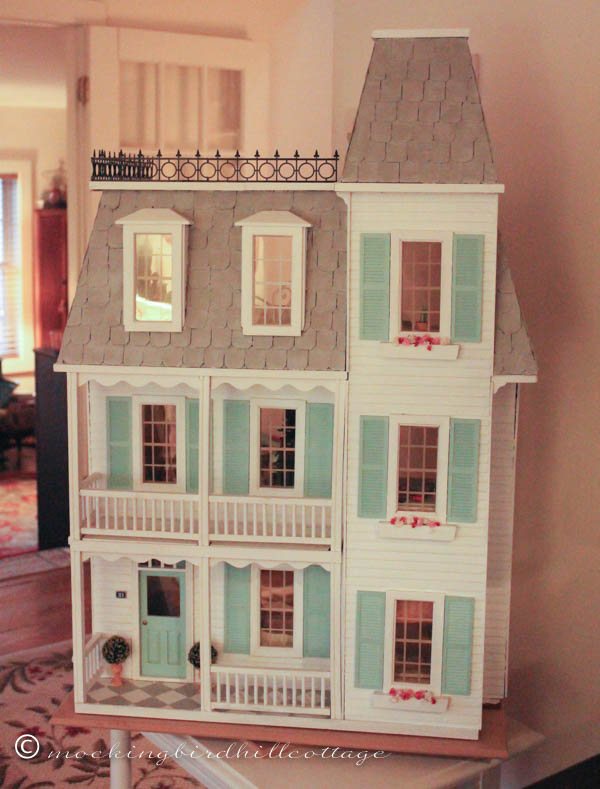
I’m thrilled with it. I don’t know why I didn’t think of it sooner! It really finishes off the roof. Don says it looks “elegant.” There’s a segment of the iron work that extends from the back of the potting shed to the edge of the roof on the right, but you can’t see it in this photo.

miniironwork2

All in all, a very exciting day at Hummingbird Cottage. Carpet installed, ironwork installed, Christmas Tree in place. Looks like both Mockingbird Hill Cottage and Hummingbird Cottage need to do some decorating now!

The tutorial I used was from the blog, My Projects in Miniature. Here’s the link.

I’m off to change some more passwords.

The book review I promised for today will be posted tomorrow instead. I’m just now finishing the book – and I really love it, so I don’t want to rush my reading experience. It’s that good.

Happy Wednesday.

ClaudiaSignature140X93

Filed Under: Christmas, decorating, DIY, dollhouse, miniatures 38 Comments

Houston: We Have Bookshelves

November 30, 2014 at 9:46 am by Claudia

Before we get too far into this post, let me be clear about the bookshelves. They are very basic. The only thing more basic might be boards and cinder blocks and I’ve had a few of those in my lifetime. Nevertheless, basic or not, I love them.

I’ve wanted built-in bookshelves in the den since we moved in. I had visions of beautifully constructed built-ins along the wall behind the sofa. But because other needs/expenses almost always seem to take precedence, we’ve never been able to do it. We’ve lived here nine years. Last year, I saw a post on another blog where the thirty-something owners had put up bookshelves using standards and brackets. I was immediately taken back in my memory to a house I lived in in my mid-twenties. I remember doing that very thing, on a more modest level, in my bedroom. It seemed a bit retro – sort of mid-century modern, a style I grew up with – it was just called contemporary in those days – and not necessarily a look that I wanted to recreate in my current home.

But I kept going back to that photo and eventually came to the conclusion that it would look entirely appropriate in this den of ours.

Why not? Why not, I said to myself, do something like this NOW, rather than wait for some date in the far-off future when I might have the funds to hire a carpenter to build a fancy bookcase? I showed the blog photos to Don, and he said, “Go for it.”

Even so, I didn’t get around to it until this year. When I decided that now was indeed the time, I measured the wall space and the length of the sofa, checked for the location of the studs using my stud finder, which can be finicky, so I checked it over and over again, devised one configuration, then scrapped it and went for another. I drew up a plan.

Then I figured out the length of the shelves, based on the footprint of the sofa and the location of the studs. Left side of the sofa: 37″. Right side of the sofa: 24″ Three standards on the left. Two standards on the right. Six shelves on either side. A total of 30 brackets. Last week we went to Lowe’s and purchased everything – the pine was special grade because I was planning on staining it and didn’t want a lot of knots. One very nice guy at Lowe’s figured out how much wood we would need and another very nice guy cut all the wood for us. I crossed my fingers and hoped all my calculations were correct.

We brought everything home and earlier this week, taking advantage of a very warm day for this time of year, I sanded and stained all the shelves-to-be.

Yesterday we put them up.

bookshelves1

After sleeping through most of it, Scout decided to check out the action in the den.

bookshelves2

That drill has to be about 25 years old. I bought it when I was living in Cambridge, MA. Someday I’ll upgrade to a fancy new one, but for now, it works.

bookshelves3

I originally considered painting the wood, but I’m glad I decided to stain it instead. We have lovely pine floors and wood blinds and I felt that staining the wood would result in a warmer, cozier look. We really like it.

bookshelves4

Late in the day: shelves in place, drill, chuck, wood, measuring tape, screws, screwdriver, and level scattered around the room.

bookshelves5

Photo taken this morning, so it’s still darkish in this room. I’ve added a few books, but I’m going to let the shelves evolve. I’m not going to grab a lot of books from the upstairs bookshelves and move them down here. Both of us added a few favorite books, some signed by the authors, some vintage. My To Be Read pile moved from the desk to the shelves. I’ll eventually add some books from the shed (fingers crossed.) And let’s face it, I accumulate a lot of books, so these babies could be filled in no time.

bookshelves8

I forgot how fiddly brackets can be. They don’t always fit snugly, they sometimes move to the right or the left. And I’ve learned, especially on these shorter shelves, that things need to be balanced, not necessarily visually, but most definitely in terms of weight distribution.

This room is very small, with windows on all sides, so it’s notoriously hard to get a good photo. But here’s my best shot this morning.

bookshelves7

We never think that something like this will make the room look bigger, but, as is often the case, it does. And Don loves the way the shelves on the left and the window frame one of our favorite pieces of art. Me. too.

I’ll post more photos as I add to the shelves and one day I’ll take you on a little tour.

Total cost for everything was about $300.00. We used a prime grade of pine, bought stain and a paintbrush, screws, standards and brackets.

Oh, and one of the first things I added to the shelves?

bookshelves10

The wooden egg cup Scout and Don gave me for my birthday. Isn’t he adorable?

Happy Sunday.

ClaudiaSignature140X93

Tagged With: bookshelves, Lowe'sFiled Under: books, decorating, DIY 56 Comments

Evolution of the Dollhouse – Part Six

June 19, 2014 at 9:08 am by Claudia

I’ve been so busy with the garden and Spring and working on the road that I have neglected my little series. I believe I owe you one more segment, right? Since I plan to visit Chautauqua Miniatures on Monday, let’s get back into a dollhouse kind of mood.

dhevolutiongraphic
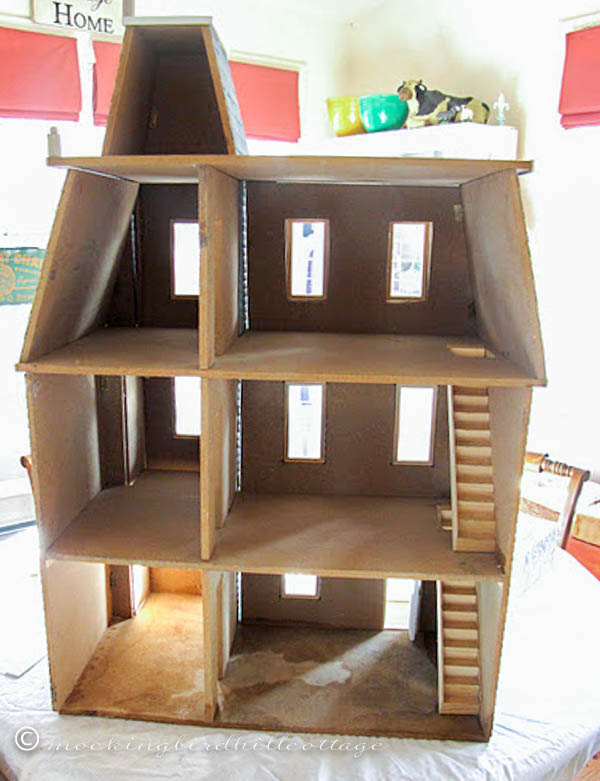
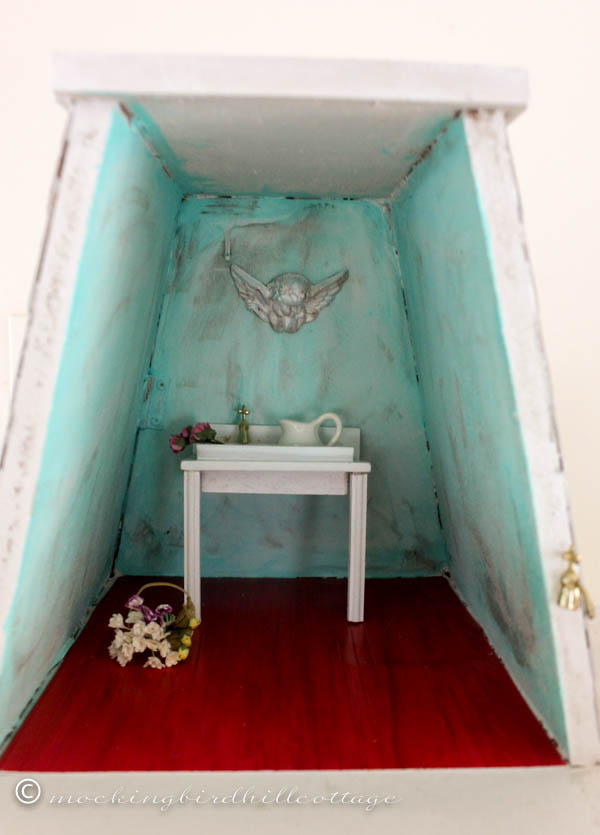
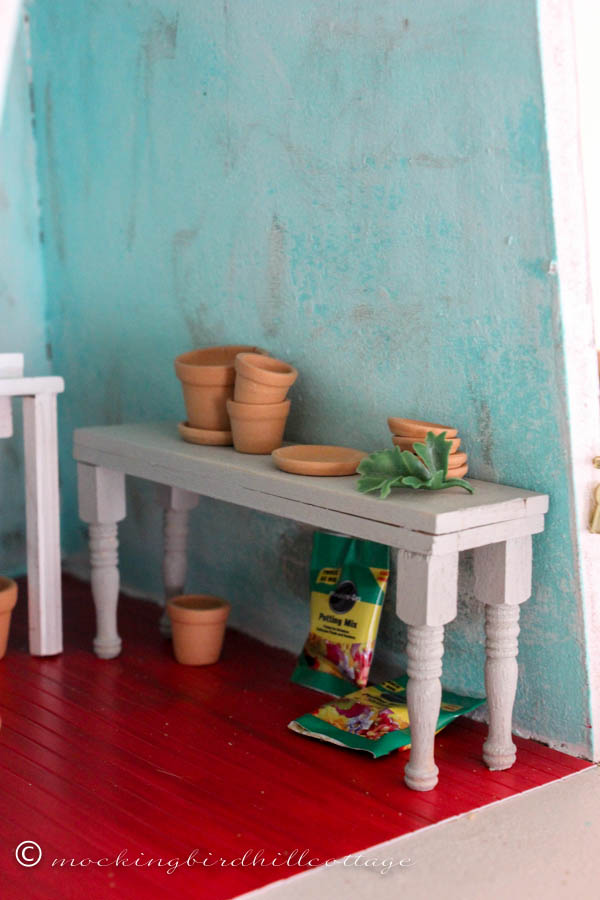
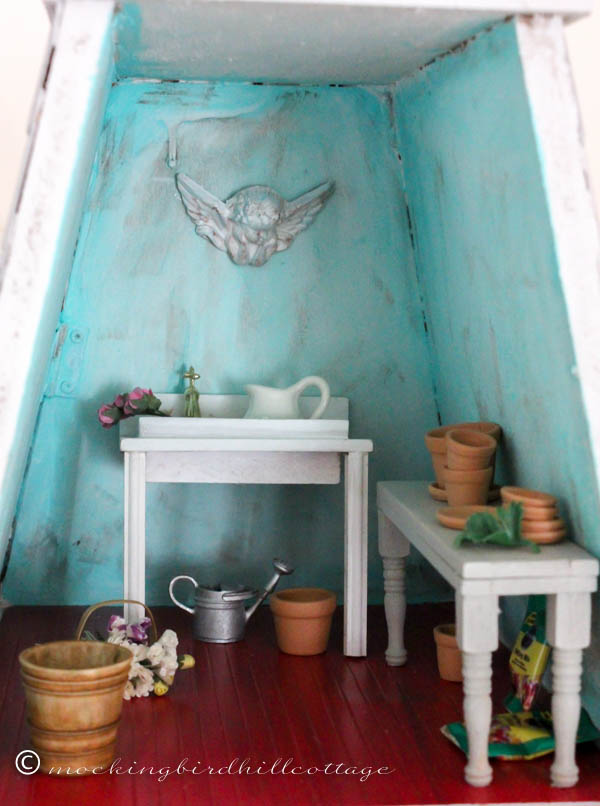
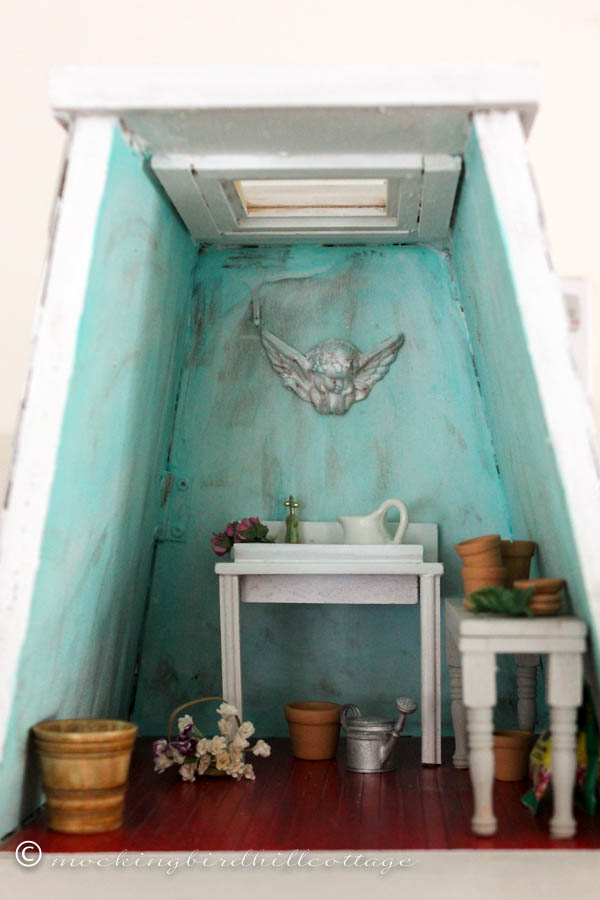
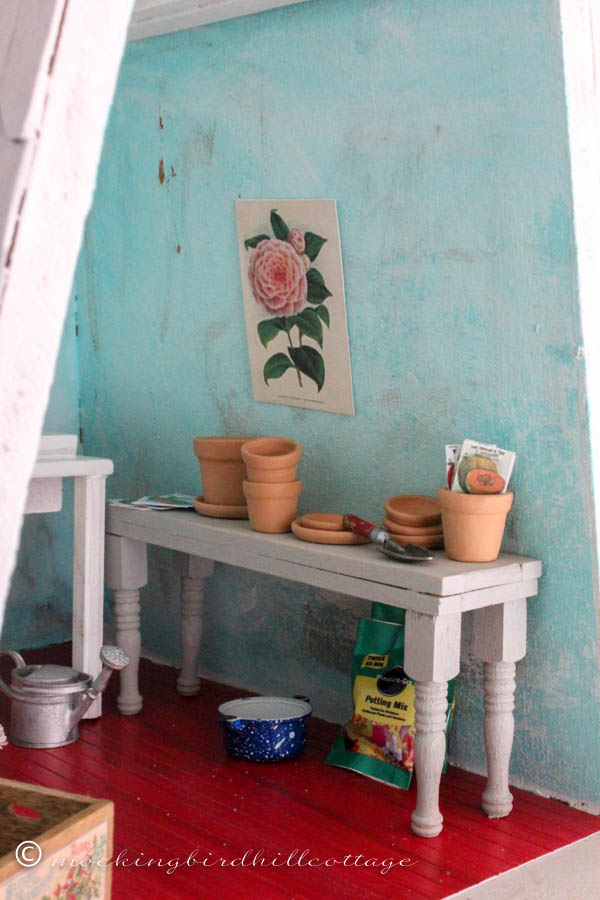
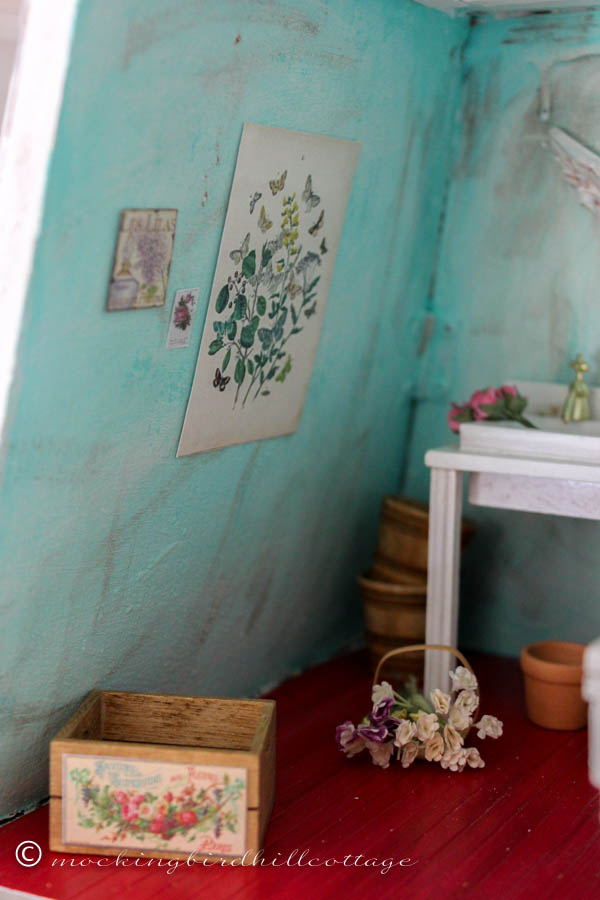
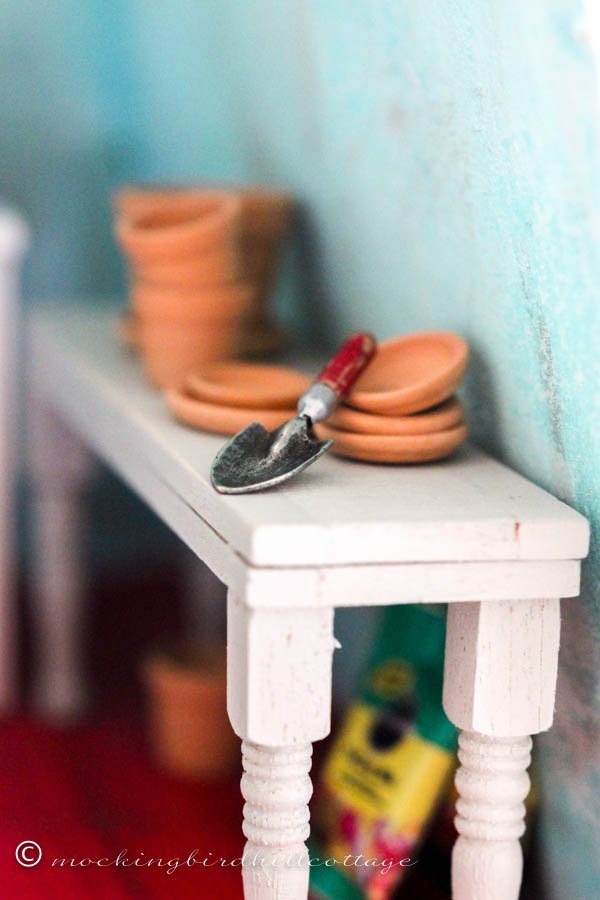
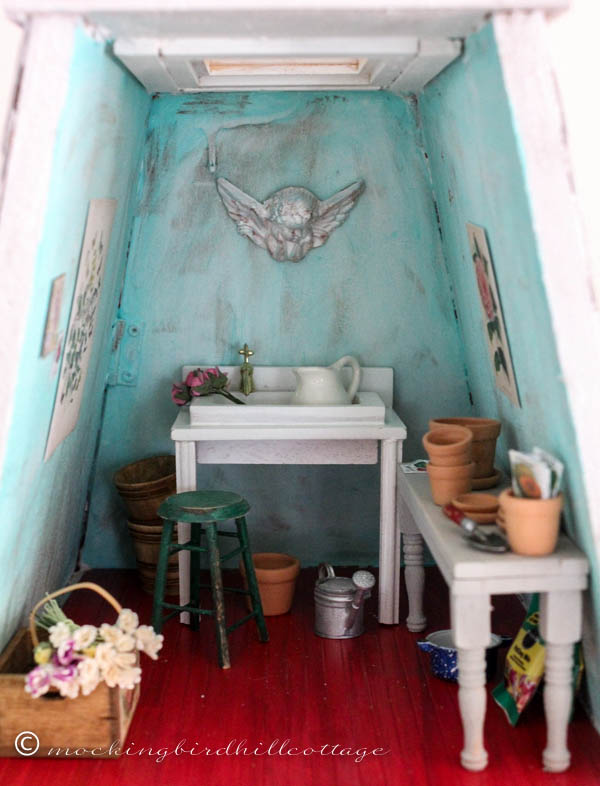
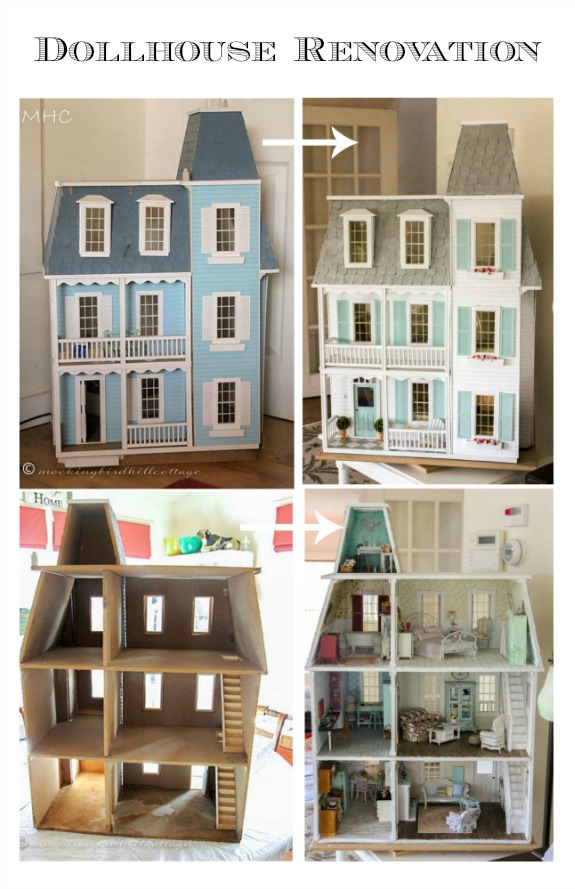
All through the renovation, there was one room that I totally ignored. You can see it at the very top of the house on the left. On occasion, I would stop and wonder what the heck I was going to do with it, but the main house was my priority. So I thought of it as a potential attic and figured I’d artfully stash some minis up there and call it a day.

weddollhouse3

Have I ever told you how creative my husband is? One day we were looking at the dollhouse and I was going on and on about my ideas for it and I mentioned my lack of inspiration for that space. My husband knows what a devoted gardener I am, so, to him, having it be some sort of potting shed or greenhouse made sense and he told me so.

Brilliant. (It had never occurred to me.)

Well, that got me going and I suddenly found myself excited about the possibilities for that room and for the roof itself (the roof will eventually be Part Seven of the Renovation Series.)

pottingshedsaturday

One day, I just went for it. I grabbed some aqua colored paint and painted the walls. Since the texture of the walls was already uneven, I went with that and rubbed some of the paint off, adding some antiquing gel to age them further. I wanted the room to look shabbily aged, like an attic room that has been repurposed for very little money.

At this point, I wasn’t in the mood to lay a wood floor made out of popsicle sticks, so I grabbed some leftover beadboard, cut it to fit the floor space, and painted it red. It was a time saving move, but it ended up being one of my favorite things about this room.

I had a bathroom vanity that someone had given me, but I wasn’t going to use it because it was out of scale – it was too tall. But you have to think outside the box and I realized I could definitely use the sink. So I took it apart and made some legs from trim that I had on hand, put it together and, what do you know? It worked!

The cherub on the wall came from my stash of all sorts of stuff that I keep in the cupboard in the studio. I thought it would be the perfect architectural artifact for the room. I had the big white pitcher and the flowers and basket in my stash.

dhpottingroom3

Next on the agenda was some sort of potting bench. I made this from some shutters in my stash. The legs were made from some newel posts that I had on hand and I cut them down to work with the table top. I ordered the pots and the potting soil from miniatures.com.

dhpottingroom1

The watering can and large pot on the left also came from miniatures.com.

So far so good, but not quite there yet.

There was one idea that kept percolating in my brain. I measured the space and ordered the necessary element. It arrived. But I was a little hesitant and I didn’t do anything until I was in one of those What the heck? kind of moods and then I went for it. Out came my keyhole saw. I traced the opening. I drilled a starter hole. And then I sawed. And sawed.

It worked.

dhskylight

Behold, my skylight! I love, love it. And it’s one of the tweaks I made to the dollhouse that I am proudest of. After all, the owner needs some natural light in her potting space, don’t you think?

I keep adding things here and there:

mondhcamelliapotting

The internet is an amazing source for dollhouse printables. That’s where I found the seed packets and the botanical poster on the wall.

mondhbotanicalpotting

And these. I love the butterflies. I got that crate from Weston Miniatures (on Etsy.) It inspired the crates I made for the Miniature Swap. (By the way the minis from that swap have arrived, but I have to wait until I get home to open the box!)

sundhcorner1

The trowel also came from Weston Miniatures.

fridaypottingshed

The latest addition is the green stool, which I ordered from miniatures.com and painted and aged. (That hinge, by the way, was added by the dollhouse’s original owners. I’ve managed to cover most of them up. I’m plotting what to do to hide this one. To Be Determined.)

Next up, when I have the time and the funds, will be the rooftop garden. Oh, do I have plans for that space!

The winner of a copy of Moving Day is Linda from A La Carte! Congratulations, Linda!

Happy Thursday.

ClaudiaSignature140X93


Tagged With: dollhouseFiled Under: DIY, dollhouse 29 Comments

  • « Previous Page
  • 1
  • 2
  • 3
  • 4
  • 5
  • 6
  • …
  • 33
  • Next Page »
  • Email
  • Instagram

Welcome!

Welcome!

I live in a little cottage in the country with my husband. It's a sweet place, sheltered by old trees and surrounded by gardens. The inside is full of the things we love. I love to write, I love my camera, I love creating, I love gardening. My decorating style is eclectic; full of vintage and a bit of whimsy.

I've worked in the theater for more years than I can count. I'm currently a voice, speech, dialect and text coach freelancing on Broadway, off Broadway, and in regional theater.

Thanks for stopping by.

Searching?

The Dogs

The Dogs

Scout & Riley. Riley left us in 2012. Scout left us in February 2016. Dearest babies. Dearest friends.

Winston - Our first dog. We miss you, sweetheart.

Lambs Like to Party

Lambs Like to Party

A Note

Thanks for visiting! Feel free to browse, read and enjoy. All content is my own; including photos and text. Please do not use anything on this site without permission.

Disclosure/Privacy Policy can be found in the Navigation Bar under ‘About MHC.’

Also, I love receiving comments! I do, however, reserve the right to delete any comment that is in poor taste, offensive or is verging on spam. It’s my blog. If you’re a bot or a troll you’ll be blocked. Thanks!

Archives

All Content © 2008 - 2025 Mockingbird Hill Cottage · Log in

This website uses cookies to improve your experience. We'll assume you're ok with this, but you can opt-out if you wish.Accept Reject
Privacy & Cookies Policy

Privacy Overview

This website uses cookies to improve your experience while you navigate through the website. Out of these, the cookies that are categorized as necessary are stored on your browser as they are essential for the working of basic functionalities of the website. We also use third-party cookies that help us analyze and understand how you use this website. These cookies will be stored in your browser only with your consent. You also have the option to opt-out of these cookies. But opting out of some of these cookies may affect your browsing experience.
Necessary
Always Enabled
Necessary cookies are absolutely essential for the website to function properly. This category only includes cookies that ensures basic functionalities and security features of the website. These cookies do not store any personal information.
Non-necessary
Any cookies that may not be particularly necessary for the website to function and is used specifically to collect user personal data via analytics, ads, other embedded contents are termed as non-necessary cookies. It is mandatory to procure user consent prior to running these cookies on your website.
SAVE & ACCEPT